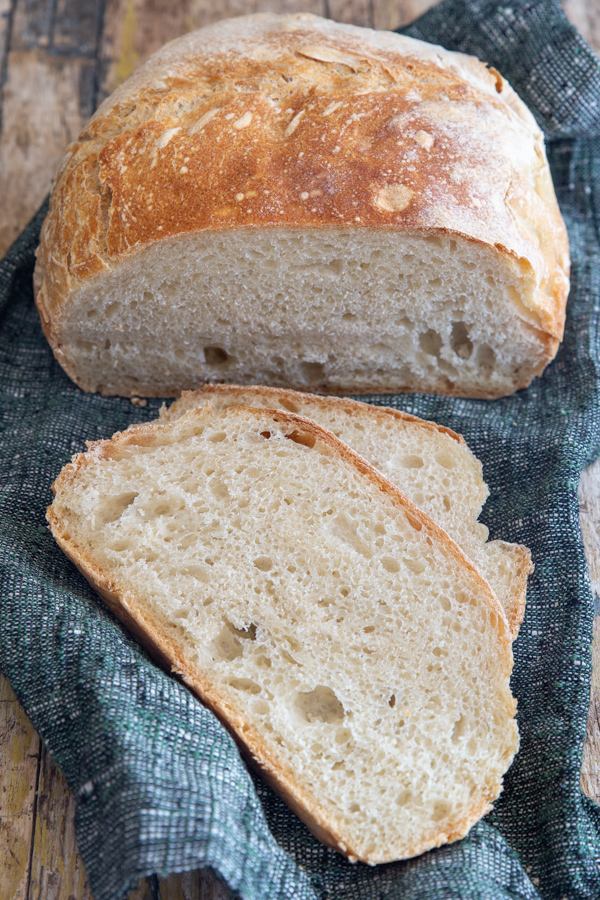
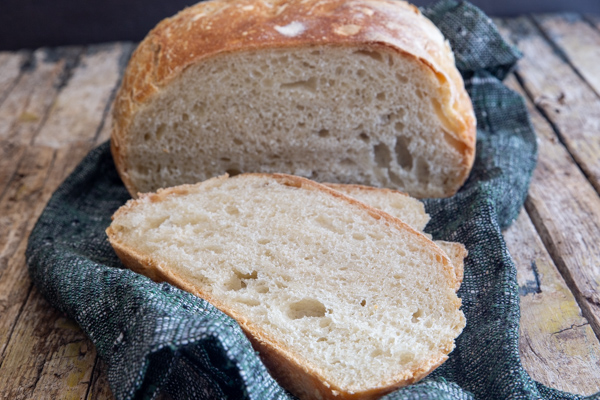
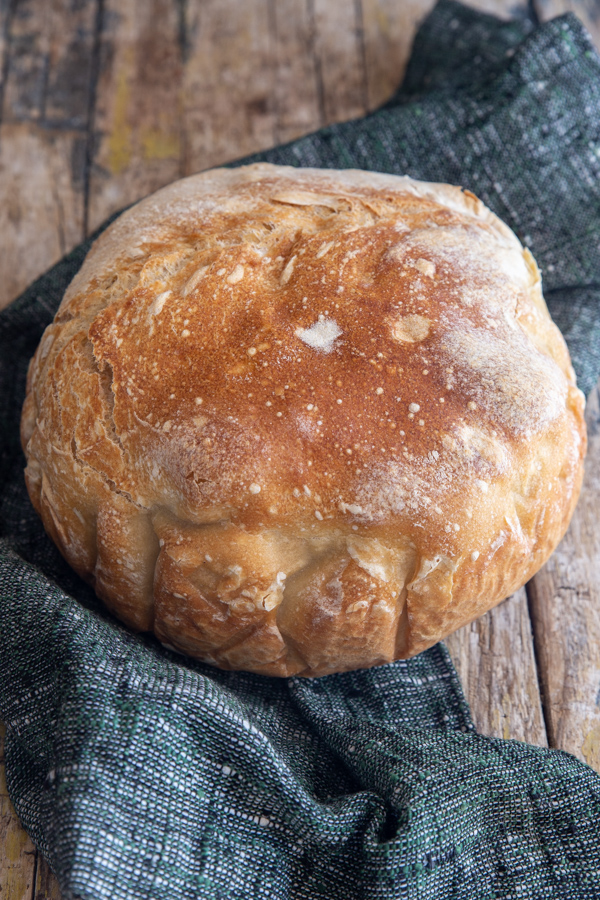
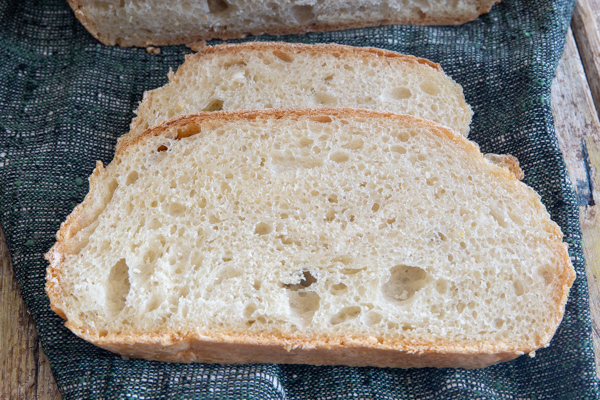
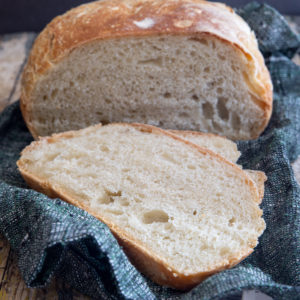
Rustic Italian Bread with Lievito Madre
This Rustic Italian Bread is made with Lievito Madre, a low hydration starter that is used in Italy. A delicious anytime bread to serve with soups, stews, on it’s own or as a sandwich bread.
After getting started on Sourdough Starters from a Classic (more popular) to an Italian Lievito Madre to an even simpler one made with Yeast, I have to say my fridge is full of jars. If you have never made a sourdough starter before, trust me now is the time to start!
How to make it
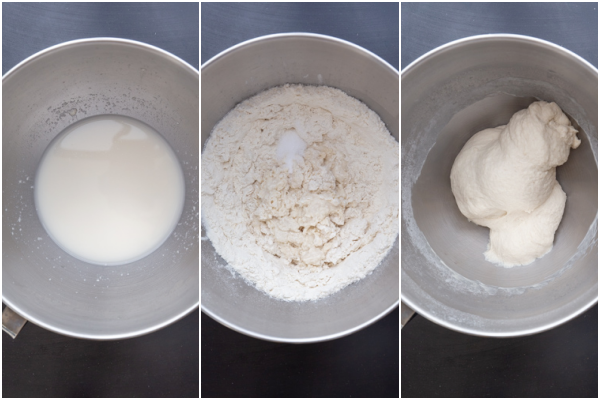
In the stand up mixer add the fed and active Lievito madre (in pieces), the honey and water, mix either with the flat beaters, a danish whisk or spatula until it is almost combined and milky in colour.
Add the flour and with the dough hook start to knead then add the salt and continue to knead for 7 minutes.
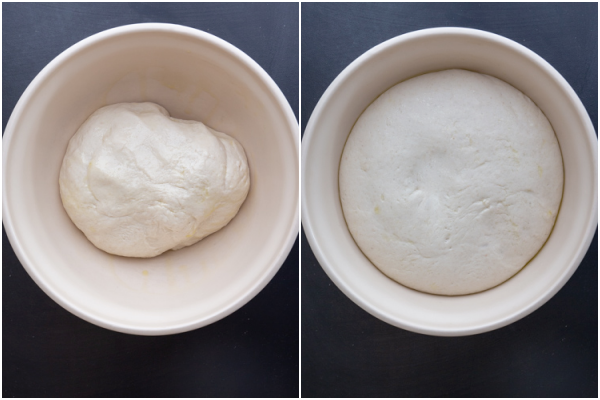
Place the dough in a lightly oiled bowl (turning the dough to coat it) cover and let rise in a warm draft free area for approximately 5-10 hours. This all depends on the warmth of your house.
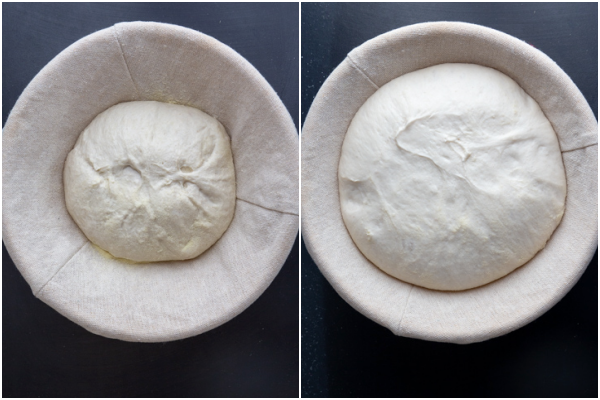
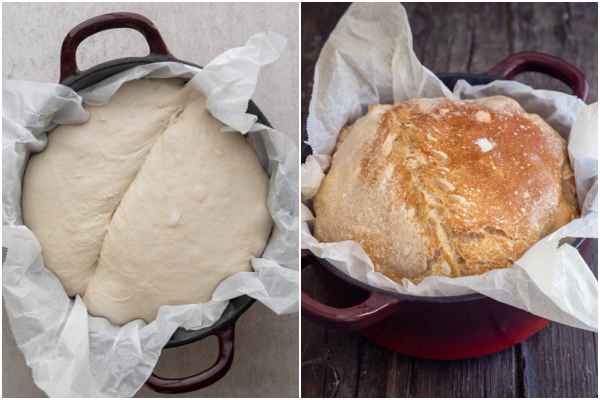
Move the dough to a lightly floured flat surface and gently flatten the dough with your hand and fold into desired shape. Place the dough in a basket or bowl, it is a good idea to line the bowl or basket with parchment paper. Cover and let rise in a draft free area for 2-3 hours or until doubled.
In the last 30-45 minutes of rising time place a dutch oven, stone or cookie sheet in the oven while it is pre-heating. Pre-heat the oven for at least 30 minutes. If using a cookie sheet or stone, place an empty pan in the oven also.
Once heated, score the dough and place in the dutch oven (carefully because it’s very hot), or score the dough and place on the stone or baking sheet with the parchment paper. For the dutch oven, place the lid on top of the dough and bake for 25 minutes lower the temperature and bake for another 15-20 minutes.
If baking on a stone or baking sheet, fill the empty pan with 1 cup of boiling water and place the dough in the oven, bake for about 30-40 minutes. Cool on a wire rack before slicing and serving.
How to feed your starter
Remove the yeast from the refrigerator and leave it at room temperature for an hour or two (it also depends on the warmth of your room). Sometimes an extra hour is needed.
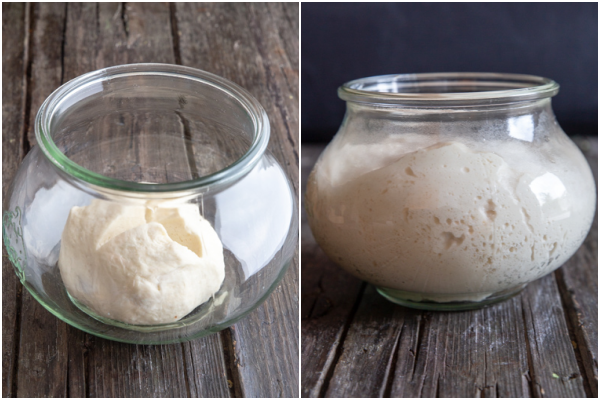
If needed remove the top layer of the dough (the dry part), weigh the dough, I usually remove 100 grams of starter and feed with 100 grams of flour (I sometimes use 70 grams bread and 30 grams whole wheat), 45-50 grams of water (lukewarm) and 1/4 teaspoon of honey. Honey will help the starter react.
Mix it all together, when it is almost combined move it to a very lightly floured flat surface and knead the dough until a compact dough is obtained. Mark the dough with a cross and place in a clean wide mouthed jar, cover with plastic and let rise, lievito madre likes a temperature between 71-77F (22-25C). You can also brush the dough very lightly with olive oil to help prevent a crust from forming.
If the dough has been kept for more than a week in the fridge, you should repeat the feeding and rising times, usually 1-2 extra times is enough. The remaining dough can be placed in a clean glass jar and refrigerated.
The Discard sourdough starter can be used to make other recipes, or if you don’t have enough for a recipe, it can be refrigerated. Which is what I have done.
How to know when the starter is ready for baking?
One way you can tell if your starter is ready is to use the floating method, to fill a glass bowl or cup with room-temperature water then drop a a teaspoon or even a bit less of the starter into the water. If it floats, it’s ready to use. With the floating method sometimes it isn’t very accurate, so I usually go by when the starter doubles in volume in about four hours after feeding, then your starter is ready for baking.
The best way to track the growth of the starter is once you have fed it and placed it in a jar, place an elastic band around the jar where the starter reaches, that way anything over is growth. Make sure it doubles or even triples before using.
What is the best water to use
Be sure to use lukewarm water between 98-105F (36-40C). And be sure to use water without chlorine, chorine can kill your starter . And of course do not use distilled water. Regular filtered tap water is fine.
What is the best flour to use
I like to use a strong all purpose flour (11.5-12% protein) or a bread flour, you can even substitute 1/4-1/3 of the flour with whole wheat if you prefer.
How to know when the dough has risen enough
There are a few ways to tell, the most common being when the dough has doubled in bulk, when you can see small air bubbles underneath the surface of the dough or you could use the poke method, poke the dough lightly with your finger, if the indent comes back quickly and disappears then the loaf is not proofed enough and should you should give it 30-45 minutes more, if the indent does not come back then your dough is over-proofed. If the dough comes back slowly and leaves a slight indentation then it is perfectly proofed.
How to know when the bread is baked
The most popular way of telling if bread is done is to tap it on the bottom if you hear a hollow sound it’s done. Although if you prefer the temperature method, then for sourdough bread, it should read about 205-210 F (96-98C).
How to store it
I like to store mine in a paper bag rather than plastic. Sourdough bread will also stay fresher than regular bread, it will keep fresh from 4-5 days at room temperature. Just be sure not to refrigerate it. Storing it in the fridge will make it dry and stale and not very tasty.
How to freeze bread
Be sure to cool the bread completely then wrap in plastic or foil and place in a freezer safe bag, be sure that it is an airtight bag. It will keep in the freezer for up to 3 months. You could also slice the bread before freezing. To thaw the bread, leave it at room temperature still in the bag. Then heat it for about 10 minutes in a low oven before serving.
If you are looking for more recipes for your Lievito Madre then I hope you give this Rustic Italian Bread with Lievito Madre a try and let me know how it goes. Buon Appetito!
Rustic Italian Bread with Lievito Madre
Ingredients
- ⅓ cup +1 ¾ tablespoons lievito madre (active) (100 grams total)
- ½ teaspoon honey
- ⅔ cup + 1 tablespoon water (lukewarm) (166 grams total)
- 2 cups + 1 tablespoon all purpose flour or bread flour* (266 grams total)
- 1 teaspoon salt
*If you wish you can substitute part of the flour with whole wheat, I would not substitute more than half the flour.
Instructions
- In the stand up mixer add the fed and active Lievito madre (in pieces), the honey and water, mix either with the flat beaters, a danish whisk, or spatula until it is almost combined and milky in colour.
- Add the flour and with the dough hook start to knead, then add the salt and continue to knead for 7 minutes.Place the dough in a lightly oiled bowl (turning the dough to coat it) cover with plastic wrap* and let rise in a warm draft free area for approximately 5-10 hours. This all depends on the warmth of your house. My dough was ready after 5 hours.
- Move the dough to a lightly floured flat surface and gently flatten the dough with your hand and fold into desired shape. Place the dough in a basket or bowl, it is a good idea to line the bowl or basket with parchment paper. Cover and let rise in a draft free area for 2-3 hours or until doubled.
- In the last 45 minutes pre-heat the oven to 450F (250C)place a dutch oven, stone or cookie sheet in the oven while it is pre-heating (If using a stone or cookie sheet pre-heat oven to 425F (225C). If using a cookie sheet or stone, place an empty pan in the oven also.
- Once the oven has been heated (at least 30 minutes), score the dough and place it in the dutch oven (carefully because it's very hot), or score the dough and place on the stone or baking sheet with the parchment paper. For the dutch oven, cover the dough and bake for 25 minutes then lower the temperature to 400F (200C) and continue baking for about 15-20 minutes. If baking on a stone or baking sheet, fill the empty pan with 1 cup of boiling water and place the dough in the oven, bake for about 30-40 minutes. Cool on a wire rack before slicing and serving. Enjoy!
Excited to try, I was a sourdough fanatic during Covid… Do you think I can make rolls out of this. Also, would substituting milk for water enrich the dough a bit?
Hi RC, yes you could make rolls out of the dough, I have never added milk to it, but if you want to you could try, maybe try with half water and half milk. Let me know if you do. Take care! This is an Easter (sweet dough) sourdough made with milk.
Hi,
I love your page. I’m a little confused about the first instruction and want to know how many grams rather than cups and table spoons of starter to use.
For one loaf, two or three no matter how much increase in starter to us, it still says 100 grams.
Is the same for water and flour.
Can you please clarify this for me please?
Thanks
Gavin
Hi Gavin, I have updated it to show in the metric, so just ignore the tablespoons. I wish everyone used metric it would make it a lot easier. 🙂 Take care.
What would you say would be the Lievito Madre levain when it’s ready to blend with the other flour? Would you say 77-78 Fahrenheit?
Hi Argo, I never go by temperature I go when it has doubled in volume. It is best to have it rise at a temperature between 65-77 degrees. Hope that helps.
Hi so I’ve made my starter dough using your recipe, I’ve had it for over a month in the fridge, with weekly feeding. So to make this bread, do I remove my starter from fridge, get it to room temp ,feed it, and let it rise several hours before removing some for this recipe? Then I put the rest of the feed starter back in fridge? Sorry for such a question but this is my first time using starter. I will say my starter looks fabulous!
Hi Meredith, no problem ask all the questions. Leave it a room temperature, then I usually remove 100 grams of starter and feed with 100 grams of flour, 45-50 grams of water (lukewarm) and 1/4 teaspoon of honey. Honey will help the starter react. For the flour I usually add 30 grams of whole wheat and 70 grams of regular all purpose or bread flour. The leftover starter you can use to make discard recipes. And then continue as you said, let it rise several hours before removing some for this recipe? Then I put the rest of the feed starter back in fridge? Discard shouldn’t be older then 3 days old. Hope that helps, let me know.
This is very informative because i have been baking for many years and i had to depend on the old time bakers to seek knowledge that you are giving free…Thank you so much because this will help all future bakers!
Hi Anthony, thanks so much, glad I could help. Take care.
So based on baking this once this is a really nice recipe, very different percentages then I use for the italian breads I have been baking from a natural starter the last year. i developed my recipe from a recipe that Carol field has for a Puglia country loaf with bakers percentages of 1:.8:.02:.25 which I have enjoyed. this one is on the order of 1:.65:.06:.4 which is very different. I was a little worried about the proportion of starter but this baked up beautifully the loaves as my wife described are cute (much smaller then the 800g loaves I typically make) and the flavor and crumb is exceptional. the low hydration starters do not give as sour a loaf and with the small loaf you need to watch the bake time. I have a very active starter that I built a year or so ago and the rises for me were on the order of 2.5 hours and 1.8 hours. This recipe is another keeper. I am enjoying going through some of your bread recipes, its unusual to find italian bread recipes much of anywhere. About the only Italian breads I dont care for are the tuscan breads which always taste flat with the minimal salt
Hi Chet, thanks so much. Haha yes I tend to make smaller breads now that it’s just me and my husband. I just started baking again with starter dough and I love it, my fridge is full of jars :). Oh yes saltless bread very popular here, it actually makes a delicious bruschetta, we sprinkle it with salt and then drizzle with oil. Take care.
What a nice recipe, it is similar to a couple of recipes in Carol Fields Italian baker with a lot of biga and less salt. I have been working on some italian bread recipes the last few years after spending several years baking french style breads with natural starters. A couple of notes on baking this, i’ve done this recipe for the last several weeks for my weeks bread. 1. this is not a great recipe for a natural starter, there is so much biga that the sourness overwhelms things so I am just using an overnight biga with yeast . I always use less yeast then recipes call for, i have been making my biga with 1/4 t of yeast and just leaving on the counter overnight, i like the long slow fermentation. I’ve been experimenting with salt and like about 16g-17g of salt, not the 20g in the recipe. I also use malt syrup instead of honey but both are nice food for yeast if you choose to use it. I’ve done it both ways and haven’t seen a bunch of difference in flavor or rise. I have been baking the boules in a cast iron dutch oven and they come out beautifully. Again, this is a great recipe and I am taking it and using it as one of my 5-6 basic bread recipes going forward. Love it
This comment got on the wrong recipe, should have been on the Italian bread with biga. I am trying this recipe today with my starter
Hi Chet, that’s ok, let me know how it goes.