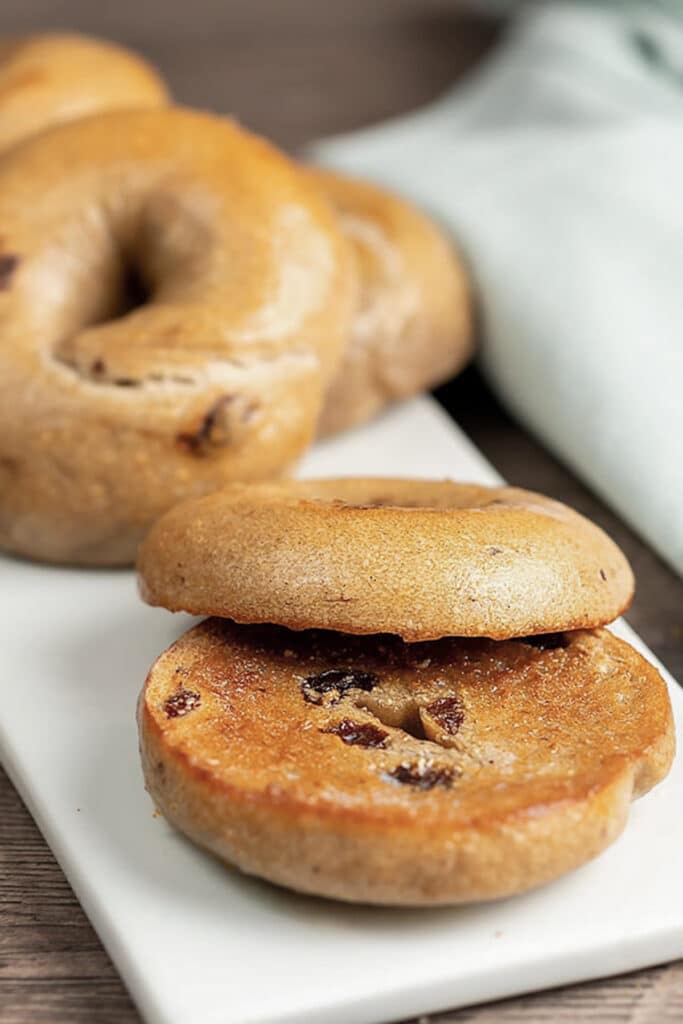
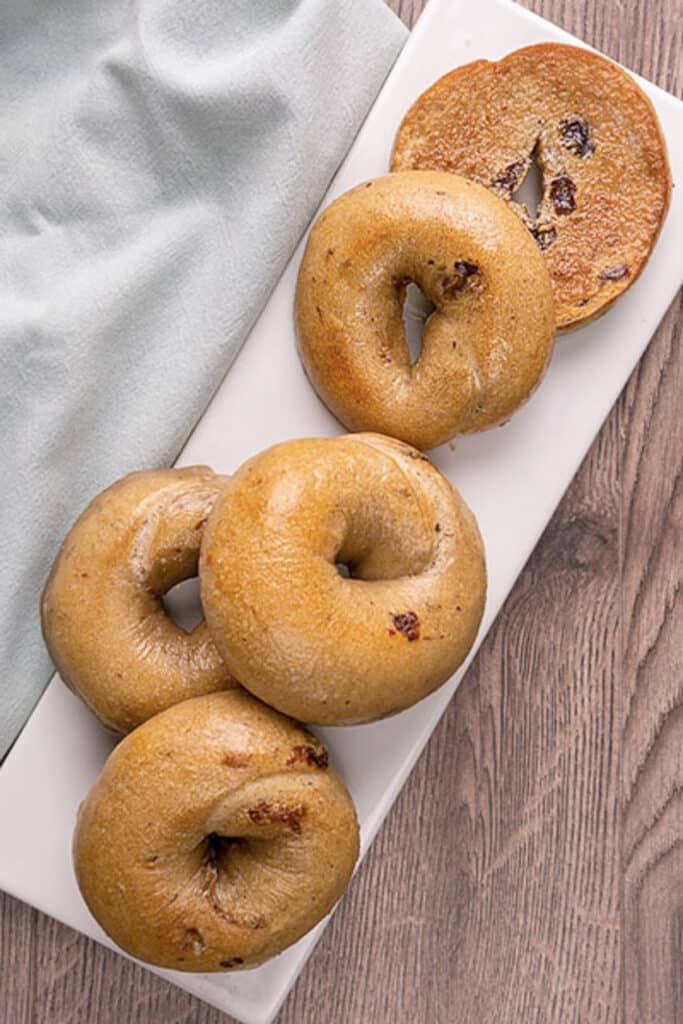
Homemade Cinnamon Raisin Bagels
Nothing like Homemade Bagels and these Cinnamon Raisin Bagels are a must try! Perfect for breakfast or snack. Toasted or plain they will become a family favourite.
I have been a lover of bagels since forever, when I started working full-time in Toronto they were my major food purchase. I would go to Druxey’s and get a large coffee double cream and a double melted cheddar cheese toasted bagel for breakfast. Oh no, now my mouth is watering!
Now whenever I go back to Canada, doesn’t matter who I am staying with, I must have a toasted cinnamon raisin bagel with butter and peanut butter every single morning. Can you tell I can’t find bagels in Italy?
Bread was the new “in” thing back in 2020. But I must say it made me extremely happy to hear that. For me there is nothing like making and baking your own Homemade Bread. I have said it before and I will say it again, bread making isn’t difficult, it just needs time. And most of that time is spent waiting.
And what better way to start, then with these Homemade Bagels, they are delicious. These are a two day bagel, which means, the dough has to rest in the refrigerator for 12-18 hours.
Recipe Ingredients
- Cinnamon – ground cinnamon
- Vanilla – vanilla extract
- Raisins – soaked plump raisins
- Yeast – active dry yeast
- Water – lukewarm
- Flour – bread flour
- Salt
- Honey – or granulated sugar
- Egg – one beaten egg for brushing
How to soak raisins
Plump up the raisins by soaking them in boiling water for about 10-15 minutes, then drain and towel dry them. This way the raisins won’t take moisture from the dough when baking, which will cause a dry not very enjoyable result.
Why use active dry yeast?
Since the dough has to rise in the fridge for approximately 12 hours it’s best to use active dry yeast and not instant yeast.
What temperature is lukewarm?
Lukewarm is considered between 105-110F (40-43C). Be aware that the yeast will die at a temperature over 140F (60C).
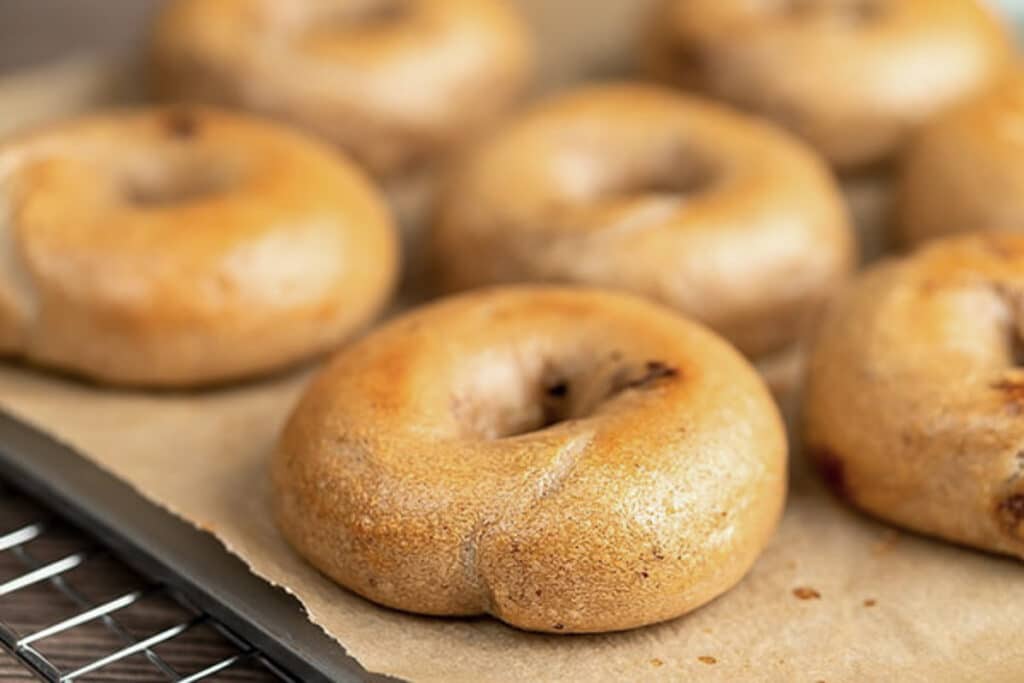
How to make Homemade Bagels
In a small bowl mix together the cinnamon, vanilla and the soaked and drained raisins. In a small bowl mix together water and yeast let sit until foamy.
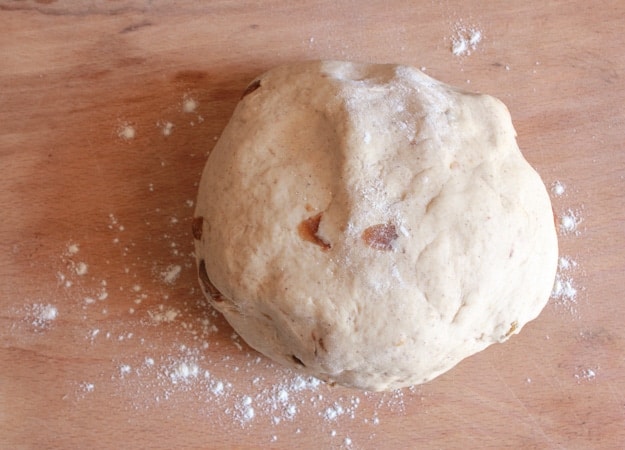
In the mixing bowl of a stand up mixer add the flour, salt, honey, then add the yeast mixture and the cinnamon mixture, mix at the speed #1 with the dough hook attachment, when the dough starts to come together increase the speed #2, continue kneading until the dough is smooth and elastic.Remove the dough to a lightly floured flat surface.
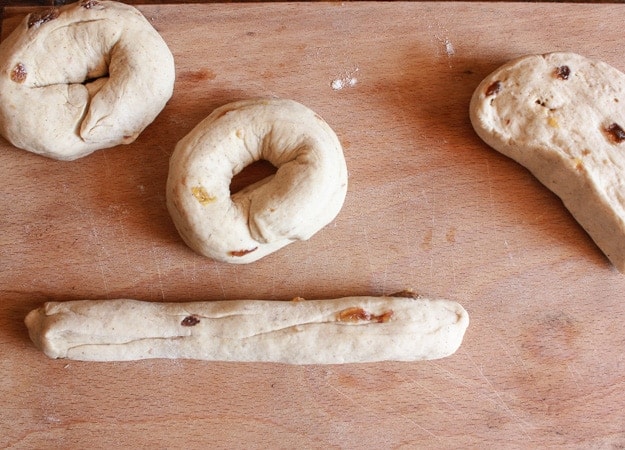
Divide the dough into 7 portions. Roll each portion into a ball, cover and let rest. Form each of the balls into a rope then shape into a circle, joining the ends.
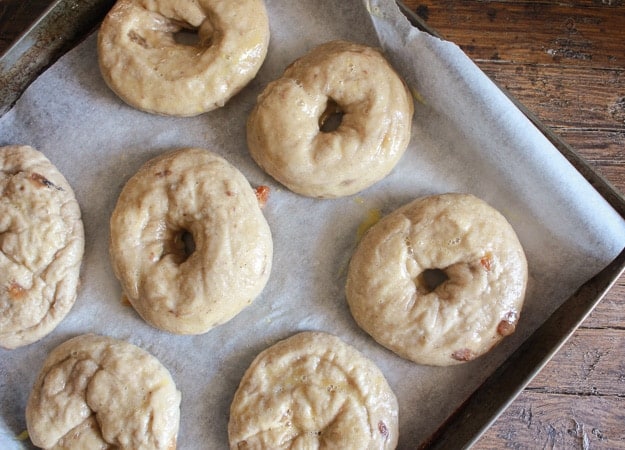
Dust a large baking sheet lightly with flour, place the rings on the sheet, cover tightly with plastic wrap and refrigerate overnight. Remove the dough from the fridge and let sit.
Boil the bagels in the boiling water, remove them and drain on a wire rack. Place the boiled bagels again on a baking sheet, brush with the beaten egg and bake for approximately until golden. Move to a wire rack to cool completely.
I must admit I did a lot of research on what produces the best bakery bagel, some bagels can be made same day, some aren’t boiled and some insist on using barley malt syrup.
Needless to say I wouldn’t know where to start looking for that in Italy, but I did discover that the perfect substitute is honey. No problem with finding that.
Why Boil the Bagels?
They are boiled because it helps give bagels that shiny golden crust which they are famous for and also helps them hold their shape while baking. So needless to say boiling is a very important step in making them perfect.
What I loved the most about making these bagels is most of the work was done by my stand up mixer. And I must admit, the amazing smell of cinnamon, don’t you just love it?
How to substitute fresh yeast for dry yeast
To substitute with fresh yeast you need double the amount. In other words, 1 teaspoon of active dry yeast is 3 grams therefore you would need 6 grams of fresh.
How to store them
Baked and cooled bagels should be stored at room temperature in an airtight bag. They will last up to 4-5 days but are better if eaten within two days, as they can get stale and dry out.
How to freeze them
There are 2 ways to freeze them, when they are baked and completely cool, place in a freezer safe bag and put in the freezer, they will last up to three months in the freezer.
Or you can freeze them after they have risen in the fridge, but before they are boiled. Freeze them on a cookie sheet until firm then move to a freezer safe bag or container. When ready to make, let them thaw or almost completely thawed, boil and bake.
One of my favourites. These Homemade Cinnamon Raisin Bagels were enjoyed by all, the Italian was quite impressed, better than a bakery! Enjoy! With peanut butter or without.

Homemade Cinnamon Raisin Bagels
Equipment
- stand mixer
- mixing bowls
Ingredients
- 1 teaspoon cinnamon
- 1 teaspoon vanilla
- ¼ cup raisins (plump them up by letting them sit in boiling water for 10-15 minutes, drain and towel dry)
- 1 teaspoon active dry yeast
- 1 cup + 2 tablespoons lukewarm water (255 grams total)
- 3½ cups bread flour (or all purpose)
- 1½ teaspoons salt
- 1 tablespoon honey
EXTRAS
- 8 cups water
- ¾ tablespoon honey
- 1 large egg (beaten)
Instructions
- In a small bowl mix together the cinnamon, vanilla and raisins.
- In a bowl add the water, sprinkle the yeast on top and let sit for approximately 5 minutes.
- In the mixing bowl of a stand up mixer add the flour, salt and honey, then add the yeast mixture and cinnamon mixture, mix at lowest speed (#1) with the dough hook attachment, until dough just starts to come together, approximately 3-4 minutes. Increase the speed to medium low (#2) and continue for approximately 8-10 minutes, until the dough is smooth and elastic.
- Remove the dough to a lightly floured flat surface and divide into 7 portions. Roll each portion into a ball, cover them and let rest for 10 minutes.
- Form each of the balls into a rope approximately 10 inches (25 cm) long and shape into a circle, join the ends, (the ends should over lap by about 1 inch (2½ cm) (damp the ends with water to stick them together).
- Dust a large baking sheet lightly with flour, place the dough rings on the sheet, cover tightly with plastic wrap and refrigerate 12-18 hours.
- Remove the dough from the fridge and let sit for 1 hour at room temperature.
- Pre-heat oven to 420° degrees (210° celsius).
- In a large pot add the 8 cups of water and ¾ tablespoon of honey bring to a boil.
- Add the bagel rings 2 or 3 at a time, boil for 60 seconds, turn over and boil for another 60 seconds.
- Remove and drain on a wire rack.
- Place the boiled bagels on a parchment paper lined baking sheet, brush them with a beaten egg and bake for approximately 15-20 minutes or until golden, if bagels are not golden underneath, flip over and bake for another 3-5 minutes. Remove the baked bagels immediately to wire rack to cool completely. Enjoy!
Notes
Nutrition
Updated from July 6, 2015.
It’s All About Pasta
Amazing pasta recipes to make your mouth water!

Authentic Italian Desserts
75 Traditional Desserts Made Easy
Just made them waiting for them to come out of oven . Question what if I use instant rapid yeast ? Do I still have to do the soak to activate yeast ?
Hi Kerri if you use instant yeast then no you don’t have to soak it, and you need to add less yeast. So every teaspoon of instant yeast is equal to 1 1/4 teaspoons of active dry. Hope that helps.
Hi,
If I want to double or triple the recipe to freeze, do we freeze from the fridge and then when we bake, I’m assuming we let them thaw out beforehand.
Thank you!
Hi L, ok so you should let them rise, then freeze them before boiling, let them thaw or almost completely thaw and then boil and bake. Hope that helps.
These bagels were super easy to whip together & the best tasting cinnamon raisin bagels that I’ve made(I’ve tried 2 other recipes that took much longer to prepare + proofing the dough. Made a double batch to throw in my freezer & I’m going to make another to share with friends!!!
Hi Rene thanks so much, so glad you liked them. Take care.
I followed this recipe and incorporated a suggestion from another blog to knead the dough in some cinnamon sugar (we like a little more sweetness in the dough), and the bagels turned out really well! I made mini-bagels and followed a reader suggestion to poke a hole through the balls of dough. The next time, I thought I’d try the recipe on the other blog as a comparison and the dough was so, so sticky. Will stick to yours 😎 Thank you!
Hi Shl, thanks so much, so glad you enjoyed them and thanks for the tips. Take care.
Super great recipe ! The bagels were so yummy, great crust and super fluffy on the inside 🙂
Hi Julia, thanks so much, so glad you enjoyed them.
Delicious! Way better than store-bought!
Thanks Ellen, so glad you liked them. Take care.
Hi! Can you mix by hand if you don’t have a mixer?
Hi Mary, yes you can mix by hand, just be sure to it enough until the dough is smooth and elastic, probably about 10-12 minutes. Let me know how it goes.
Thanks for the lovely recipe. I tried it and was initially a bit sceptical but the bagels came out beautifully. I will surely try them again soon.
Hi Kiran, thanks so much, so glad you enjoyed them. Take care.
That was delicious. I wasn’t sure if 13h in the fridge was enough or if I should have left it longer but I’m really happy with the result ! I might add a bit more cinnamon next time because I really like it ! I only made 6 and had to share with roommates so next time I’ll make double and try and freeze them !!! Thank you for the recipe !
Hi Sarah, thanks so much, so glad you enjoyed them. Take care.
I just made these today and they are fantastic. Instead of rolling them into a rope and attaching the ends, I just used my thumb to poke a hole in the ball. They turned out great and I didn’t need to worry about them coming apart. I will definitely make these again! Thanks for the recipe.
Hi Bonnie, thanks so much, so glad you enjoyed them. And that’s a great idea. Take care.
Your recipe for bagels with the stand mixer is the best and easiest I have ever tried. I will definitely make them again soon. Thanks!
Thanks Deborah, so glad you liked them. Take care.
Hi there! My bagels are currently in the fridge waiting to be boiled and baked in the morning.
I came back here to see if I had to let them warm up before boiling (which I do) and I just have to say that the new videos that play on most blogs now (in the top right hand corner) are super annoying and frustrating. I tried to close it 3 times without success and kept being taking away from the recipe I was trying to read.
Unfortunately I’ve been noticing this trend on lots of blogs and it’s leading me to choose paper cookbooks more often.
Anyways- I have never been a fan of honey so I subbed maple syrup for honey and I’m excited to see the results. Thanks for sharing this recipe- the dough smells amazing and my husband can’t wait for breakfast.
Hi, I haven’t tried recipe yet, question- is the honey replacing baking soda in the boiling water? Other recipes I saw had baking soda in the water. Thx
Hi Alice, yes it is replacing the baking soda. I hope you enjoy it. Take care.
I’ve tried making this this weekend and I love it so much. Simple and Delicious! Thank you so much for the recipe.
Thanks JJWK glad you like them.
I don’t have a stand-up mixer. Do you have a version of this recipe to be made by hand?
Hi Lynne, then you can just knead the bread by hand until smooth and elastic, about 10-12 minutes, then just continue with the rest of the recipe.