Easy No Knead Ciabatta Bread
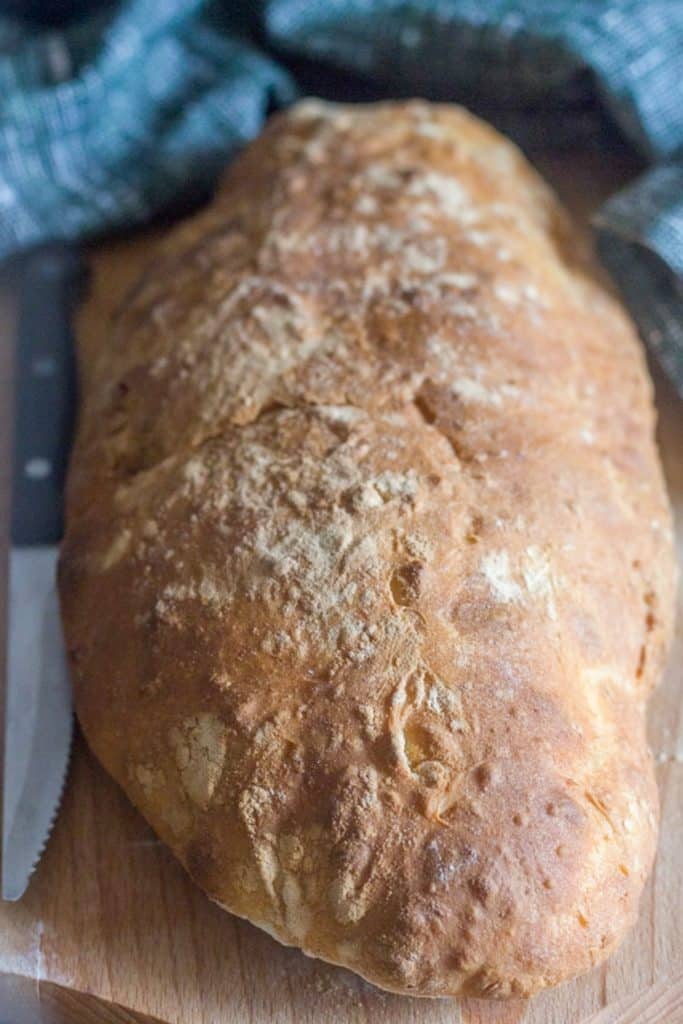
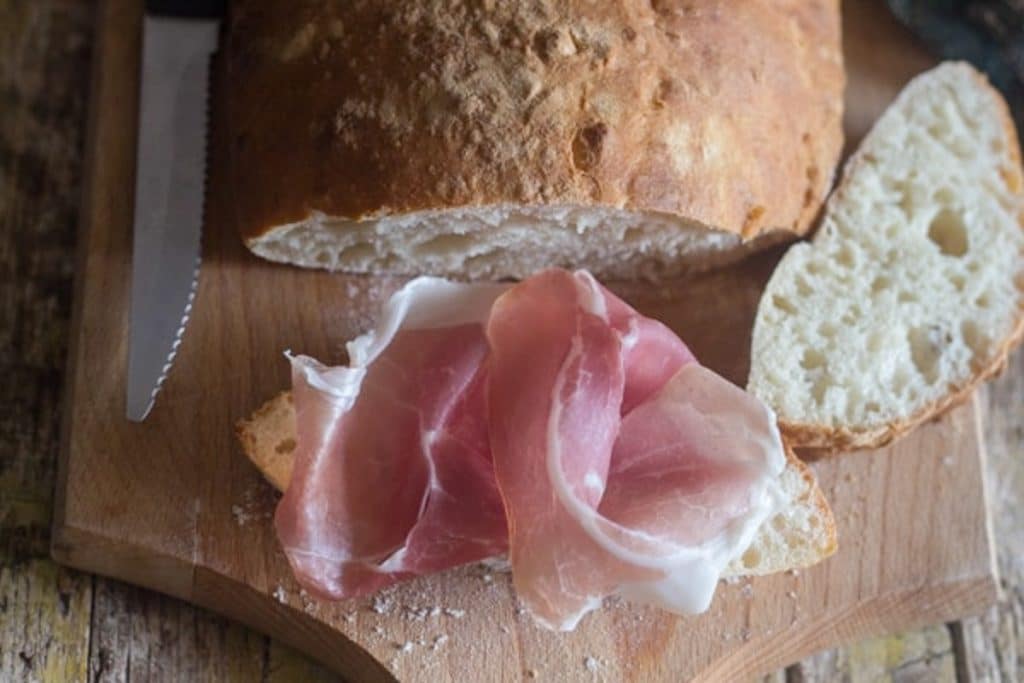
This is an Easy no Knead, One bowl Italian Ciabatta Bread. Two hours and you can have Homemade Bread for lunch or dinner. Perfect with your favorite soup or stew or with a slice or prosciutto!
When I moved to Italy, I discovered that bread was a very serious business! Fresh whether it be the local bakery or homemade fresh daily bread was a must.
Recipe Ingredients
- Water – lukewarm
- Honey
- Yeast – active dry
- Flour – all purpose flour or bread flour
- Salt
How to make a Ciabatta Bread Recipe
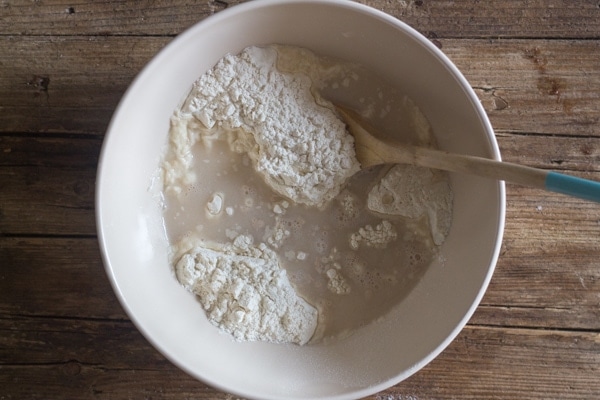
In a small bowl add water, honey and yeast, let sit 5-10 minutes then stir.
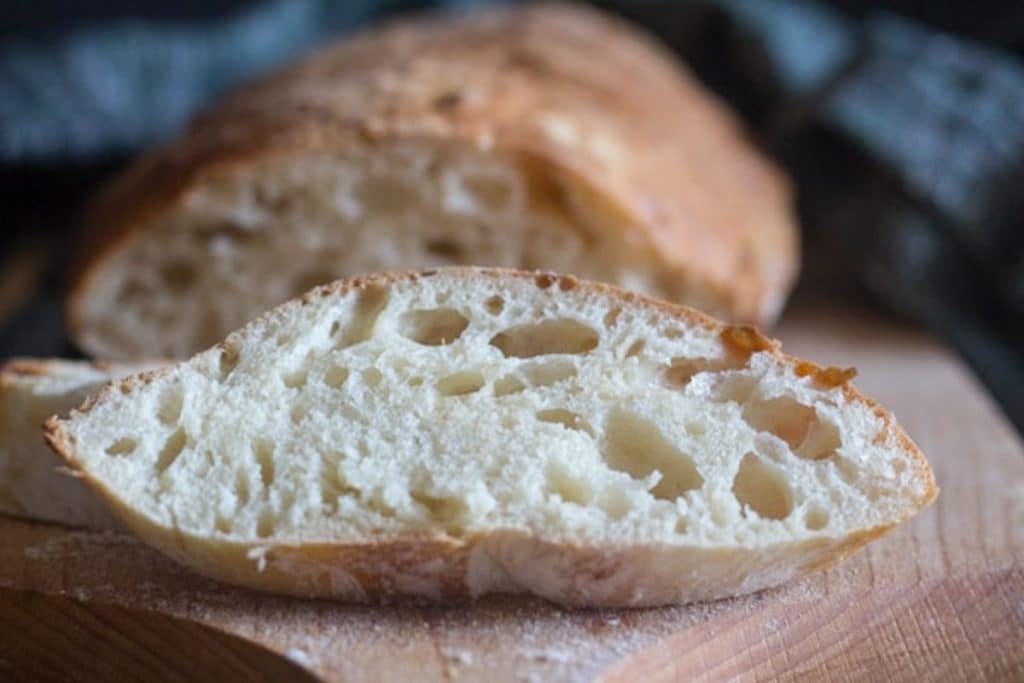
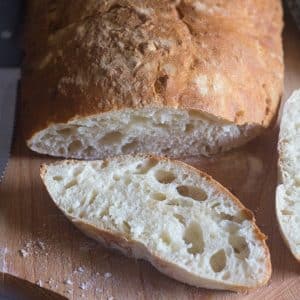
In a large bowl add the flour , make a well in the centre and add the yeast mixture and a little water, if the dough is too dry then add a little more water a little at a time, until you reach a wettish dough. But remember Ciabatta is a high hydration bread, so do not over flour, or you will not get those lovely air pockets inside the bread.
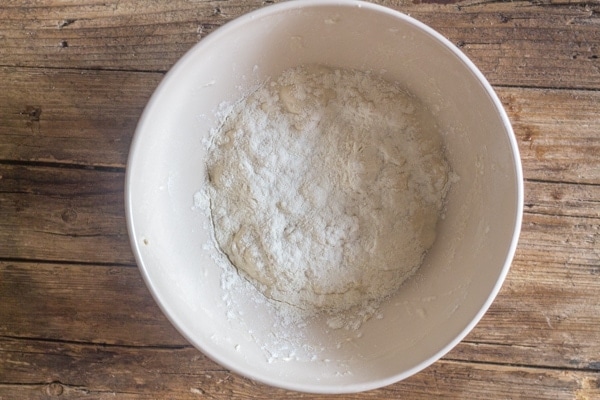
Mix together with a wooden spoon, when almost mixed add the salt and combine. The ciabatta dough will be loose and sticky. Sprinkle the top with 1 1/2 tablespoons of flour.
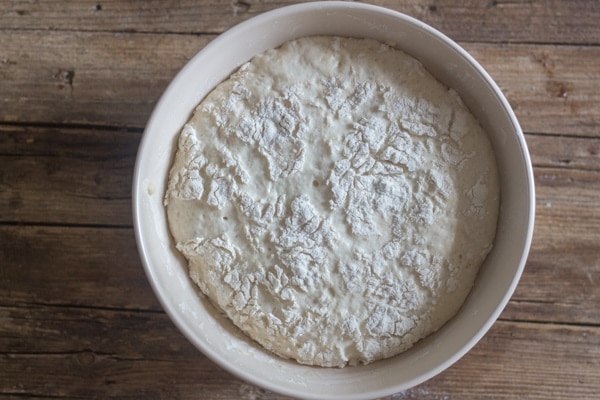
Cover the bowl with a large tea towel or plastic wrap.
Place in a warm, draft free area and let the dough rise.
Carefully move the dough from the bowl with a bench scraper or spatula to the prepared baking sheet, making sure that the floured top of the dough remains on the top. Using wet hands can also help with moving the dough easier.

With a spatula or wet hands form the dough into an oblong loaf, place some ice cubes on a pan on the bottom of the oven to create vapor or add the pan when pre-heating the oven and pour 1 cup of very hot water into the pan before adding the dough to the middle rack. Bake until golden and baked through. Immediately move to a wire rack to cool before cutting and serving.
Why do I add ice cubes or hot water?
Adding the ice cubes or hot water to the preheated oven creates steam. They melt and evaporate at just the right time. Once they evaporate and are no longer creating steam this gives the bread a chance to form that lovely outer crust.
I recommend using a thick metal dish rather than a glass or ceramic cake pan if you are using ice cubes as the difference in temperatures can cause the dish to crack.
How to tell when bread is done
You can tell bread is done when you tap on the bottom of the loaf and there is a hollow sound, but if you want to be 100 percent sure, then using a thermometer is your best best, the bread is baked when the centre of the loaf registers 200 to 210 degrees.
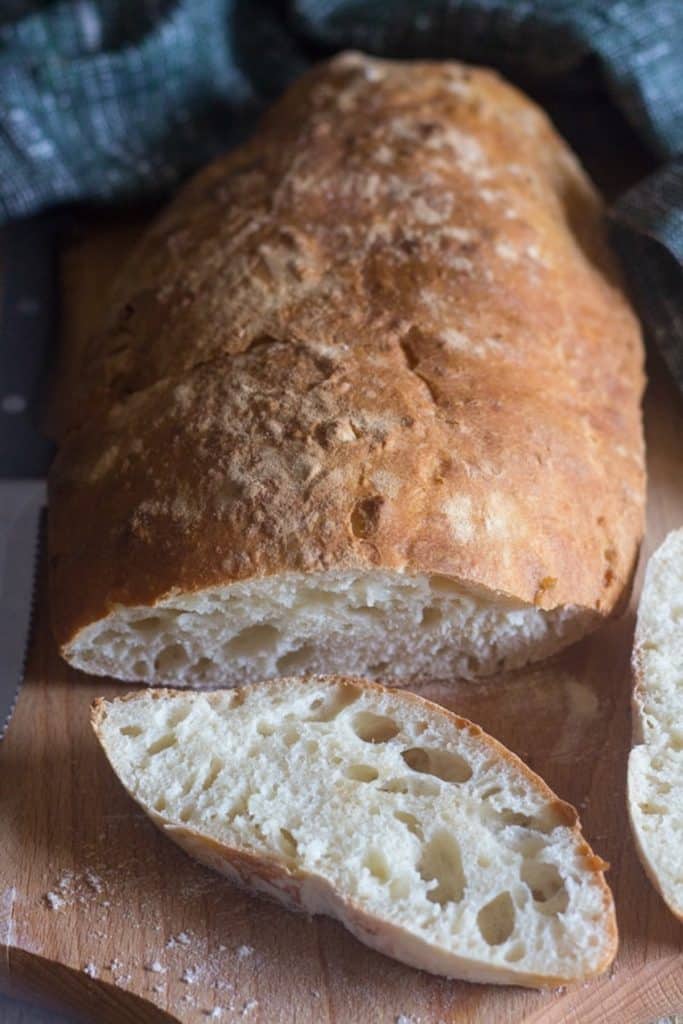
What is Ciabatta Bread
This bread is originally from the North of Italy, from the Province of Rovigo in Veneto Region. It is a flat, elongated bread with a light texture. It is a very simple bread, made up of a very high quantity of water which produced a very wet dough. It produces a very large crumb. And is considered a typical old fashioned Italian bread.
Why I became intrigued with bread making I have know idea, it started in my early twenties and went from there.
I would try making something now and then from Bagels to Pizza and the occasional Loaf of Bread.
I also discovered that bread making isn’t nearly as difficult as I thought and this Italian Ciabatta (Ciabatta meaning Slipper in English, because of the shape and flatness of the bread).
Can I substitute active dry yeast?
Yes you can substitute with instant yeast, for every teaspoon of active dry yeast use 3/4 teaspoon of instant yeast. Also be aware it won’t need as much time to rise.
How to store it
Keep the baked cooled bread, closed in an airtight bag, for 2-3 days. You can freeze it in freezer safe bags, defrost the bread in the refrigerator as needed, passing them in the oven for a few minutes to revive them. It will keep up to 2-3 months in the freezer.
This Homemade Ciabatta Bread is a simple and delicious bread. The perfect addition to whatever you are serving, amazing as a dipping bread also! I hope you enjoy it! Buon Appetito!
More delicious homemade bread recipes you may enjoy!
- Best Pizza Dough
- Homemade Olive Oil Bread Rolls
- Sweet Surprise Dessert Bread
- Easy Focaccia Bread
- Traditional Italian Ciabatta Bread
Homemade Italian Ciabatta Bread
Ingredients
- ¾-1 cup + 1 tablespoon water lukewarm (divided)
- ½ teaspoon honey (or granulated sugar)
- 2 teaspoons active dry yeast
- 2 cups + 3 tablespoons all purpose flour (or bread flour) (divided) (273 grams total)
- 1 teaspoon salt
Instructions
- In a small bowl add ¼ cup of water, honey and yeast, let sit 5 minutes then stir.
- In a large bowl add the flour , make a well in the centre and add the yeast mixture and ½ cup of water (if too dry then add the extra ¼ cup 1 tablespoon at a time until you reach a wettish dough, or if too wet add more flour a tablespoon at a time). Mix together with a wood spoon, when almost mixed add the salt and combine. The dough will be loose and sticky. Sprinkle the top with 1½ tablespoons of flour.
- Cover the bowl with a large tea towel, place in a warm, draft free area and let rise for 1½ hours.
- Pre-heat oven to 425F (220C), line a baking sheet with parchment paper and sprinkle with 1½ tablespoons of flour.
- Carefully move the dough from the bowl to the prepared baking sheet, making sure that the floured top of the dough remains on the top. With a spatula form the dough into an oblong loaf.
- Place the baking sheet on the middle rack, bake for approximately 20 – 25 minutes. Move immediately to a wire rack to cool completely before slicing and serving. Enjoy!
TO CREAT VAPOUR
- While the oven is pre-heating place an empty cake pan at the bottom of the oven, add 4-5 ice cubes or a cup of very hot water before adding the bread dough on the baking sheet to the middle shelf.
Notes
Nutrition
Updated from November 27, 2018.
It’s All About Pasta
Amazing pasta recipes to make your mouth water!

Authentic Italian Desserts
75 Traditional Desserts Made Easy
I have instant yeast here, how do I adjust the amount to be used?? TIA
Hi Teresa, you should use 1 1/2 teaspoons of instant yeast. Let me know how it goes.
Easy and very tasty – had a slight wobble when getting out of bowl and onto floured papered tray as it sort of collapsed as soon as touched, but puffed up again in the oven.
Hi Justine, thanks, glad you enjoyed it, and yes that happens. 🙂
Is The two lots of 21/2 tbsps of flour separate from the 2 cups in the recipe?
Hi Saras, yes it is extra, I added it into the ingredients. Thanks for letting me know.
hi, I made this bread and wasn’t sure what i did wrong, the bread was “moist” when i took it out , and it took me more than 20 minutes to bake the bread, when i inserted thermometer, the dough was sticking to the thermometer.
the heat in the oven was on the bottom part only, roast function, should i have used convection function?
Thanks
Hi Doris, yes the whole oven should be heating not just the top or bottom. That’s why the bread didn’t completely bake. 🙂
Hi!
I really like this recipe. My bread turned out pretty good/tasty, but more dense and not as much air pockets/crispy. Could this be because it wasn’t flat enough? About how long should the loaf be in inches?
Thanks so much
Hi Melissa, did you use bread flour? It can make a bread denser. Using a spatula fold the dough over a few times (like an envelope) that should help to give it more holes. The dough is quite flat, I think mine was about 9 or 10 inches long. I hope this helps.
Made it twice and it’s absolutely delicious! And now I have my friends asking me to make it all the time and I shared the recipe and told them it’s that easy. Just follow!!! Thanks…
Hi Aileen, thanks so much, so glad you enjoyed it and your friends too! Take care.
Easy recipe. But I don’t get the huge holes in the bread. Mine was still quite dense. Was it too much water? Should I try again with lesser water than stated in the recipe?
Hi Joanne, yes add a little less water and see how that goes. Let me know.
Hi From Northern France. I consider myself an experienced baker and 99% of baked products in our house are home made from sourdoughs, foccia and flatbreads to tortillas, bagels and baguettes. But never had a go at Ciabatta as it seemed to much of a faff.
So thought I would give this recipe a try. My first attempt wasn’t successful, more of a thin-ish splat than a loaf.
The problem may have been the use of the dreaded cups in the recipe which we Europeans find baffling preferring metric measurements. According to Alexa a cup is 280ml, but Google said a cup is 239ml, so that was how much water I used to 220g of flour. It was much too wet and I should have spotted it that at that ratio we’re at about 113% hydration, far too high. From web research Ciabatta should be about 80% hydrated (compared about 60% for a “standard” loaf). Also being so wet I had to bake it for longer and so it was browner than a Ciabatta should be.
So I had a second go this time aiming for 80% hydration I used 180ml of water to 220g of flour. And it was perfect, in shape, colour and texture. I used French Type 65 Bread flour. When the loaf had been in the oven for about 10mins and the crust developed in the steam I lightly placed a sheet of baking foil on the top for the rest of the bake to create a traditional pale Ciabatta colour, but that’s a matter of taste. Thanks for the recipe. PS: The failed first one actually tasted great and sliced horizontally it made delicious cheese toasties for breakfast, I’ll probably make that version too again but bake it in a skillet in the oven. xx
How do you get the outside of the bread to get that nice and crispy golden color?
Hi Julie, maybe you should bake it a bit longer or you could brush it with milk before baking. Hope that helps.
A favorite in our house! Make exactly as recipe states.
Thanks Lucy, so glad you enjoyed it.
Amazing! I was a bit worried it looked like a sloppy mess but it turned out perfectly. I’ve already passed it on to my sister who demanded the recipe when she saw a photo.
Hi clodagh, thanks so much, glad you and your sister liked it so much.
First time I’ve made ciabatta. I looked through a few recipes and this was the easiest so I was dubious it would work. It worked. I now have to make it every day. Only difference is I use a bread tin.
Hi Julia, thanks so glad you enjoyed it.
Best ever
This was so easy even this idiot managed to make delicious bread!!!!
Hi Robbie, haha Im sure you aren’t an idiot. Glad you liked it. Take care.
LOL…I’ll be the 2nd idiot soon!!
Hi Hugo, and I am sure you aren’t an idiot either! 🙂
I’m going to be making this tomorrow but I just wanted to write a comment about how much I appreciate how you have the jump to recipe button and how clean the print option is. Nothing is more annoying to me than going to print a recipe and it’s 5 pages long when it could easily fit on one. I also like the option to not include the picture. Thank you!!
Hi Bee, thanks so much, glad to help. Let me know how the bread goes. Take care.