Italian Sourdough Starter – Lievito Madre
Italian Sourdough Starter – Lievito Madre Recipe is made a little bit different from the more well known version. This is a lower hydration starter which also takes longer to produce. But it is well worth it.
So after making a Sourdough Starter that most of us usually use, I decided that I wanted to also give the Italian version, Lievito Madre, a try. A friend explained how it is made, time is needed but it is very easy and straight forward.
what is the Difference between Traditional Sourdough Starter vs. Lievito Madre
When it comes to sourdough baking, there are two popular approaches: the traditional sourdough starter and lievito madre, an Italian-style fermented dough. While both are used to naturally leaven bread, they are different not only in hydration, but also flavor and maintenance.
Hydration Level – for traditional sourdough, starter is kept at 100% hydration, which it is fed with equal parts of flour and water by weight. The end result is a thick pancake like batter. Whereas the hydration level for lievito madre is much lower, usually around 50%, which means it is fed with two times the amount of flour than water. The end result is a stiff dough like consistency.
Flavor differences – the traditional sourdough starter has a tangy acidic flavor, whereas the lievito madre produces a milder and sweet flavor with less tang. This makes it perfect for making sweeter breads such as panettone and brioche.
Feeding the starter – a traditional starter is usually fed every 12-24 hours, of course this depends on the temperature and how often you bake. If refrigerated it can last up to a week without feeding. Mine has actually lasted a few months. On the other hand lievito madre should be refreshed every 4-8 hours during active baking time and kept in an airtight container, this helps prevent strength and prevents acid production.
Which should you use?
If you love rustic sourdough loaves with a strong tangy flavor and you like the idea of a more forgiving and easier process, then the traditional sourdough starter is for you. But if you are looking to bake not just everyday breads, but also enriched, festive breads with a subtle sweetness and light, fluffy crumb, then a lievito madre is your best choice.
How to make it
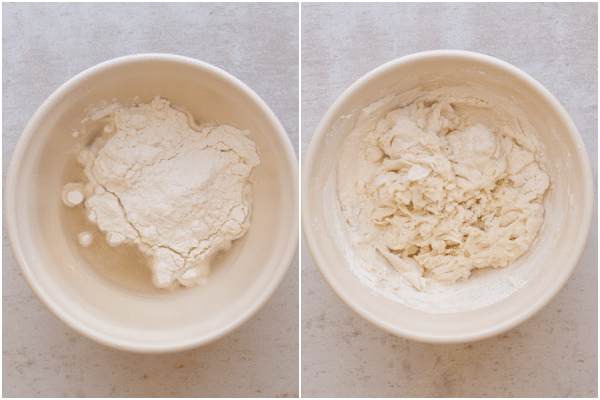
In a small bowl mix together the lukewarm water and honey, then add the flour and make a non sticky (but a little tacky) dough ball.
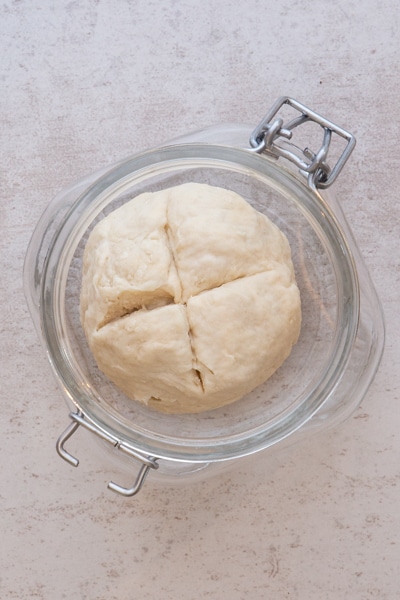
Mark with a cross. Then place in a large glass jar, place lid on top but do not close. Let sit in a warm draft free area for 48 hours.
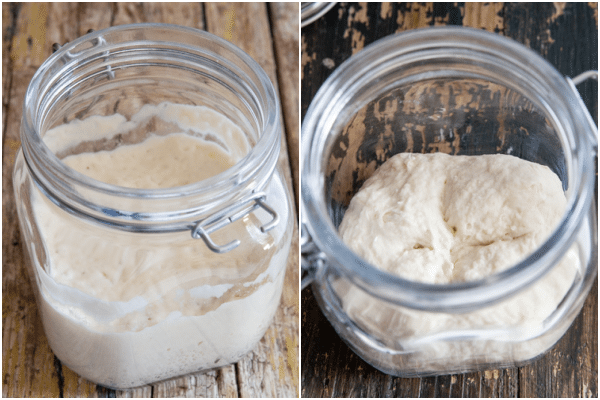
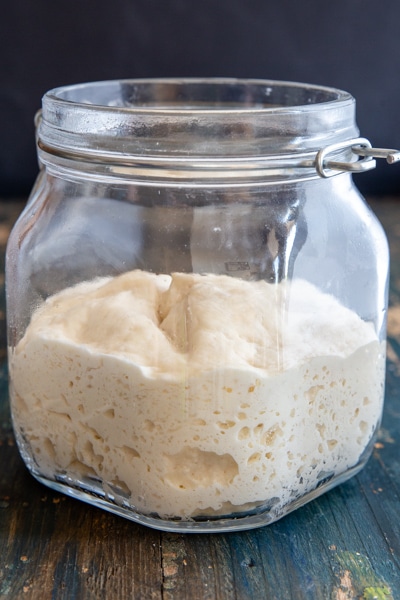
For the next four days, remove 100 grams of the dough, it’s best to remove the top part of the dough which tends to be dry, then keep 100 grams of the remaining dough (discard anything over the 100 grams), place in a bowl and add the flour and water, knead to form a compact dough, make a cross. Place in the jar (which has been cleaned, rinsed well and dried). Cover lightly and let rest again for 48 hours.
For the next 7 days remove 100 grams of the dough, it’s best to remove the top part of the dough which tends to be dry, then keep 100 grams of the remaining dough (discard anything over the 100 grams), place in a bowl and add the flour and water, knead to form a compact dough, make a cross. Place in the jar (which has been cleaned, rinsed well and dried). Cover lightly and let rest again for 24 hours.
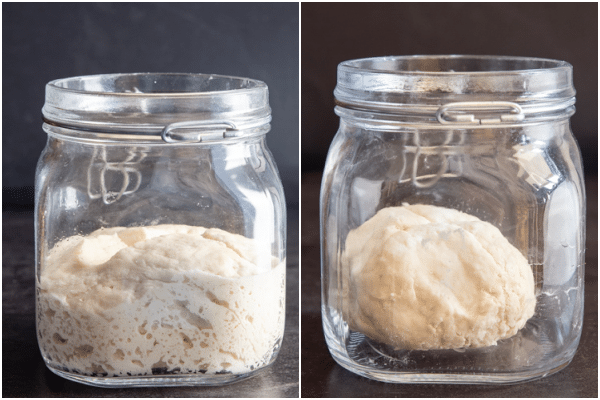
Ready to use!
What equipment do you need?
To get everything set up to start, you are going to need, a good quality all purpose flour or bread flour (unbleached), chlorine free water (bottled or filtered), a scale – because I think working in grams is best for bread, a thermometer and a large jar with a lid. The best jar to use is a glass jar with a lid, it’s best to have one that is large enough that you can stick your hand in.
Why is a Natural Starter a better choice?
A natural starter or sourdough starter gives a more intense flavour to your bread recipe. You will also have a better developed crumb, which helps the bread to grow in height rather than width. It also has a better shelf life, this is because of the level of acidity of the dough which tends to inhibit most of the moulds, it also keeps its aroma for a longer period and has a more appealing crust colour.
Some people find (me included) that it is easier to digest because of the transformation of the more complex substances into simpler ones, therefore it makes it easier for our bodies to absorb.
Why make a cross in the dough?
The cross, according to popular superstition, was used to bless the dough of bread and to drive out demons or evil forces that would have hindered the leavening. In fact, it is said that having received from the Pope, the order to bless the loaves, Saint Clare made the sign of the cross on them. So a little Italian superstition never hurt!
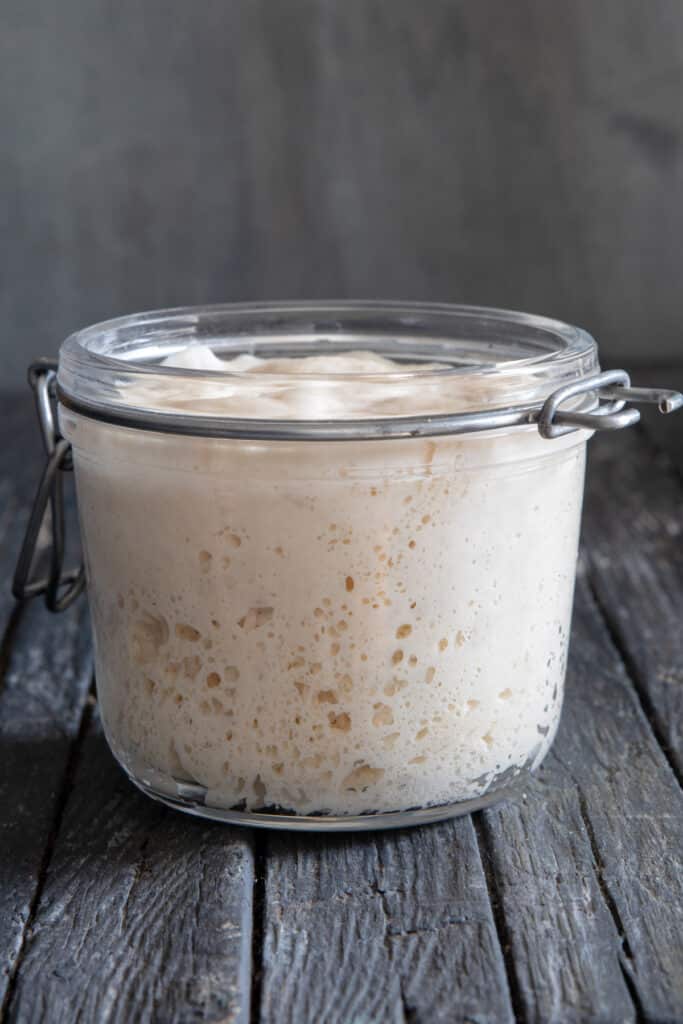
What to do when the starter is active
Once the starter is active the first thing to do is give it a name, yes people name their starters. Then you can refrigerate the starter especially if you plan on baking bread about once a week. If you plan on baking everyday then the starter should be kept on the counter. And fed once a day.
How to store the Lievito Madre
Store it in a clean glass or another container that is suitable for food, it should be at least three times larger than the starter. Leave it in the refrigerator until the next use, remember to refresh it every 5-7 days at the most if not using.
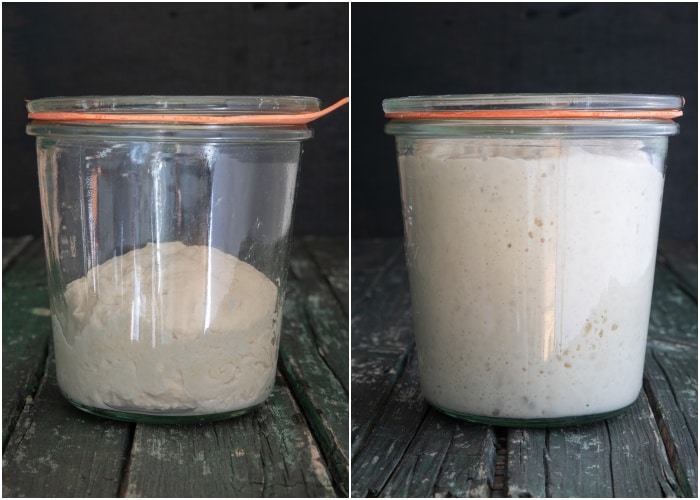
How to refresh the starter
Remove the starter from the refrigerator and leave it at room temperature for an hour, if your house is cooler, then extend the time to about 2 hours. Eliminate the top layer of the dough, which may be dry and crusty. Remove 100 grams, add 50 grams of water and 105 grams of flour. knead the dough until you get a compact dough.
Engrave a cross on the dough and place it in the clean glass jar. Let it sit at room temperature until it has doubled (3-4 hours) then place it back in the fridge.
What is the best room temperature for the starter?
The starter should be kept in a warmish room, the best temperature would be anywhere from 70 – 85F (21-30C). Although my house is around 18C and it works just fine.
how fresh should lievito madre be to use
The freshness of lievito madre depends on the recipe and how you intend to use it.
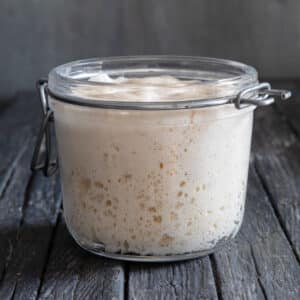
For Baking Bread or Enriched Doughs – The lievito madre should be active and refreshed before use, which means it has been fed and allowed to ferment at room temperature for 3-4 hours or until it doubles in size.
Signs of freshness in Lievito Madre – The appearance should be smooth and elastic and a little firm because of its low hydration. It should have a pleasant, mildly tangy aroma with no off putting smells or extreme sourness. After feeding, it should have doubled or even tripled within 3-4 hours at room temperature. If it hasn’t, then repeat the feeding until it does. You may need to discard some of the dough before re-feeding.
recipe tips
- If the lievito madre has been left in the fridge for more than 5-6 days without a feeding, then it is best to feed it 2-3 times over 1-2 days.
- If you are using it to make enriched doughs such as panettone or colomba or even brioche then be sure that it is well refreshed in order to produce a strong fermentation.
- Having a fresh and active lievito madre will give you the best results in all your baked goods.
If i feed my lievito madre at noon when will it be ready to use and for how long
Usually the lievito madre, in a room temperature around 68-72F/20-22C, will be ready to use 4-6 hours after feeding, it should double or triple in volume and have a mild pleasant smell. If the environment is above 75F/24C then it will probably be ready sooner, 3-4 hours. If your home is cooler (like mine) 68F/20C it could take 6-8 hours or longer to double.
You will know it’s ready when it doubles or triples in volume, feels elastic and soft with no dry or hard spots on it, it should have a mild, slightly tangy aroma. You can test it by dropping a piece of dough into a bowl of water, if it floats, it’s ready for use.
The starter will hold its peak for about 2-3 hours after doubling or tripling in volume. After 3-4 hours it may start to deflate slightly because fermentation will slow down. It can still be used but leavening might not be as strong.
For example if you feed the starter at noon, then it should be ready between 4:00 – 6:00 pm (depending on the room temperature). The best time to use it would be between 4:00 – 8:00 pm, right at its peak and slightly over.

recipe tip
If you don’t use it immediately when it’s ready, then be sure to refrigerate it after it reaches its peak this will help slow down fermentation. It can be kept in the fridge for up to 24 hours and you can use it directly from cold for most recipes. For enriched doughs such as panettone or brioche it always best to use a starter at its peak.
Why is the starter dough discarded?
The starter is discarded so that there is less flour needed to maintain it. If you just added the same amount of flour each time you refresh the starter (without removing any starter), you would eventually come to a point where the added flour is not enough to refresh the starter and it would starve. The starter is not a real starter until you have arrived at about step 9 or 10 and sometimes longer. It takes time for the organism balance to get established.
How Long Can Lievito Madre Discard Be Used?
For longer storage, freeze the discard in an airtight container or freezer bag. It can be kept frozen for up to 3 months. Thaw in the refrigerator before use. Discard kept at room temperature should ideally be used within 6-8 hours of being removed from the starter, as it will continue to ferment and may become overly acidic or inactive. Discard stored in the refrigerator can last for up to 4-5 days, provided it smells pleasant (mildly tangy but not overly sour or foul) and hasn’t developed mold or discoloration.
recipe tips
- If you’re using lievito madre discard in recipes like pancakes, waffles, crackers, or flatbreads (where leavening is less critical), it doesn’t need to be freshly fed.
- Discard that’s 1-3 days old, stored in the fridge, and still smells pleasant (mildly tangy, not sour or spoiled) is perfectly fine to use.
- Discard should not have any mold or an off color. A slight liquid layer (hooch) on top is normal and can be stirred back in.
What to make with discarded starter
Lots of people, me included, would rather not throw away food, (but unfortunately you will have to eliminate some of that starter at the beginning), and that goes for discarded starter. A fast and simple one is frying it, sprinkle with your favourite spices and fry in some oil. You could share it with friends once it is developed or you could make chocolate chip cookies.
I started to use the discard after day 10, or you could refrigerate it and keep adding the discard until you have enough for a recipe (recipes to follow). It is best used within 3-5 days.
How to substitute lievito madre for dry yeast
Approximately 5-6 grams of dry yeast or 12-15 grams fresh yeast which is equal to 100 grams of lievito madre. So if my lievito madre using 33 grams of water and 67 grams of flour, because of the 2 for 1 ratio of flour versus water, then you need to adjust your recipe by using 33 grams less water and 67 grams less flour. Of course rising times will also be longer.
recipe tips
- Be sure to feed your lievito madre before using in the recipe.
- Be aware of the hydration of the dough, if needed add small amounts of water or flour during mixing to achieve the desired dough consistency.
- You will find that there is a milder and more complex flavor compared to yeast-based doughs.
When to add extras to the dough
When adding extras such as nuts or even chocolate chips to a lievito madre dough it is best to add after the first rise, adding them too soon can affect the rise of the dough. Be sure to add them gently, this will help prevent damaging the dough’s gluten structure and will ensure an even distribution. Be sure to use only 15-20% of the weight of the flour.
How to add the mix-ins to the risen dough
Transfer the dough to a lightly floured flat surface and gently press the dough into a rectangle with your finger, the rectangle should be about 1/2 inch (1-2 cm) thick. Sprinkle the mix-ins on top of the dough, then tightly roll up the dough from the long end, then fold the dough like an envelope.
Gently fold the dough a few times to distribute the chips or nuts evenly, be sure you don’t over work the dough as this could disrupt the gluten development. Let the dough rest for 10-15 minutes, then shape into the desired form (loaf, rolls or boule). Cover and let the dough proof as per the recipe instructions.
recipe tips
- Be sure you don’t add too many mix-ins as this can make it harder for the dough to rise and bake evenly.
- Make sure that the nuts and or chips are well hidden in the dough so they don’t burn while baking.
- Try to chill or even freeze the chocolate (20-30 minutes) before adding to the dough, this can help it maintain its shape and prevent it from melting into the dough too soon.
- Be sure to spread the mix-ins evenly so that they aren’t clumped together.
Recipes with Lievito Madre
- Focaccia with Lievito Madre
- Rustic Italian Bread
- Lievito Madre Pizza Dough
- Click here for more recipes
- Lievito Madre Cinnamon Buns
- Lievito Madre Mother in Law Tongues
- Lievito Madre Discard Gingerbread Cake
- Lievito Madre Discard Pasta
- Lievito Madre Cruffins
If you decide to try this Italian Sour Dough Starter – Lievito Madre Recipe, I hope you enjoy it and let me know how it goes. Enjoy! I have quite a few more recipes to follow!
Italian Sour Dough Starter – Lievito Madre Recipe
Ingredients
STEP 1
- 105 grams all purpose or bread flour (unbleached)* (¾ cup + 1 tablespoon)
- 50 grams water lukewarm chlorine free water (85F/40C) (3⅓ tablespoons)
- 1/2 teaspoon honey
STEP 2 -11
- 105 grams all purpose or bread flour (unbleached)
- 50 grams water lukewarm chlorine free water (85F/40C)
*My daughter and I have discovered that a high protein flour (bread flour) with at least 14% protein is what the lievito madre grows best on. When using the LM for baking the type of flour can be the lower protein type of flour.
Instructions
STEP 1
- In a small bowl mix together the lukewarm water and honey, then add the flour and make a non overly sticky dough ball, it should be a bit tacky. Mark with a cross. Then place in a large glass jar, place lid on top but do not close. Let sit in a warm draft free area for 48 hours.
STEP 2
- Remove 100 grams of the dough, it's best to remove the top dry part of the dough, then keep 100 grams of the remaining dough (discard anything over the 100 grams), place in a bowl and add the flour and water, knead to form a compact dough, make a cross. Place in the jar (which has been cleaned, rinsed well and dried). Cover lightly and let rest again for 48 hours.
STEP 3
- Again remove 100 grams of the dough, it's best to remove the top dry part of the dough, then keep 100 grams of the remaining dough (discard anything over the 100 grams) place in a bowl and add the flour and water, knead to form a compact dough, make a cross. Place in the jar (which has been cleaned, rinsed well and dried). Cover lightly and let rest again for 48 hours.
STEP 4
- Again remove 100 grams of the dough, it's best to remove the top dry part of the dough, then keep 100 grams of the remaining dough (discard anything over the 100 grams), place in a bowl and add the flour and water, knead to form a compact dough, make a cross. Place in the jar (which has been cleaned, rinsed well and dried). Cover lightly and let rest again for 48 hours.
STEP 5
- Again remove 100 grams of the dough, it's best to remove the top part of the dough, then keep 100 grams of the remaining dough (discard anything over the 100 grams), place in a bowl and add the flour and water, knead to form a compact dough, make a cross. Place in the jar (which has been cleaned, rinsed well and dried). Cover lightly and let rest again for 24 hours.
STEP 6
- Again remove 100 grams of the dough, it's best to remove the top part of the dough, then keep 100 grams of the remaining dough (discard anything over the 100 grams), place in a bowl and add the flour and water, knead to form a compact dough, make a cross. Place in the jar (which has been cleaned, rinsed well and dried). Cover lightly and let rest again for 24 hours.
STEP 7
- Again remove 100 grams of the dough, it's best to remove the top part of the dough, then keep 100 grams of the remaining dough (discard anything over the 100 grams), place in a bowl and add the flour and water, knead to form a compact dough, make a cross. Place in the jar (which has been cleaned, rinsed well and dried). Cover lightly and let rest again for 24 hours.
STEP 8
- Again remove 100 grams of the dough, it's best to remove the top part of the dough, then keep 100 grams of the remaining dough (discard anything over the 100 grams), place in a bowl and add the flour and water, knead to form a compact dough, make a cross. Place in the jar (which has been cleaned, rinsed well and dried). Cover lightly and let rest again for 24 hours.
STEP 9
- Again remove 100 grams of the dough, it's best to remove the top part of the dough, then keep 100 grams of the remaining dough (discard anything over the 100 grams), place in a bowl and add the flour and water, knead to form a compact dough, make a cross. Place in the jar (which has been cleaned, rinsed well and dried). Cover lightly and let rest again for 24 hours.
STEP 10
- Again remove 100 grams of the dough, it's best to remove the top part of the dough, then keep 100 grams of the remaining dough (discard anything over the 100 grams), place in a bowl and add the flour and water, knead to form a compact dough, make a cross. Place in the jar (which has been cleaned, rinsed well and dried). Cover lightly and let rest again for 24 hours.
STEP 11
- Again remove 100 grams of the dough, it's best to remove the top part of the dough, then keep 100 grams of the remaining dough (discard anything over the 100 grams), place in a bowl and add the flour and water, knead to form a compact dough, make a cross. Place in the jar (which has been cleaned, rinsed well and dried). Cover lightly and let rest again for 24 hours.
STEP 12
- Ready to use!
Notes
Recipe Tips
I would use a jar at least 24 ounces (3 cups) or 680 grams. The dough ball should not be overly sticky although it will be a bit tacky. If it is too dry then add a bit more water. Different flours absorb water differently.How to convert regular starter to Lievito madre?
For example take – 100 g regular sourdough starter feed it with 200 grams strong flour (high protein) and 90 g lukewarm water, mix and knead into a firm dough, it should feel smooth, not sticky (a bit tacky), and hold it’s shape. After 8–12 hours (or when risen), take 100 grams from the centre (remove the top dry part), feed again with 200 grams flour and 90 grams of lukewarm water. Repeat the process after 8-12 hours. After 2–3 feeds it starts behaving like LM. After 3–5 feeds it becomes stable and ready to use.Nutrition
Updated from October 11, 2020
It’s All About Pasta
Amazing pasta recipes to make your mouth water!


Authentic Italian Desserts
75 Traditional Desserts Made Easy
I Have done the stiff starter , how do I feed it ? do i still discard 100g and how do I feed it in ratio once i have taken 100g starter to bake with. I am still learning
Hi Liana, there is a whole section on what and how to use a mature starter. Look at the section How to bake with a refrigerated starter. If you have any questions let me know.
I am just starting this today as an alternative to my normal wet starter. However, I have made a couple of changes. I am using 100% durum wheat (semola rimacinata). But since Durum wheat has high water absorption, I am working at 60% hydration rather than 50%.
I noticed elsewhere that bakers in Southern Italy, in Altamura, go for this kind of percentage. We shall see!
I will then use it for Pane Tipo di Altamura, but it won’t be in a wood fired oven, sadly!
Hi CC thanks let me know how it goes. Have a great week.
Hello, regrettably, I was unable to feed my starter on the very last step (step 11). Should I go ahead and feed it today (the following morning) as if today was step 11, call it ready to use, or is it now time to just start the process over? And for clarity, under “when storing in the fridge” how often is that feeding process happening- Or am I not feeding it again at all until I’m ready to bake?
Hi Nicole, yes you can feed it today. Once you place it in the fridge you don’t feed it again until you use it, although try to use it at least once every 2 weeks. 🙂
I started my LM in the middle of October and I LOVE it!! I accidentally killed it once but I had backup in the fridge to replace it. I have a dessert style waffle recipe that I use and enjoy. I had to mash a few recipes together to come up with it. I really need more recipes, though! Any tips on what to look for or how to convert a regular sourdough recipe into one with a lievito madre?
Hi Jennifer, thank so much, glad you like it. So if I was converting a regular sourdough starter recipe to use with a lievito madre starter I would just add more lukewarm water to the recipe as I was kneading (with the dough hook) to arrive at the dough that they say in the recipe. Here are a couple of links that might help. https://www.sourdough.co.uk/sourdough-hydration-calculator/ http://brdclc.com/?flour=1000&water=75&salt=2&leaven=20. Hope that helps. Let me know. Or you can take some of your LM starter and stir it with some water before adding it to the dough. Some people also say you really don’t have to convert anything just follow the recipe and basically add some additional water if needed.
Thanks! This helps a lot. Please consider posting more recipes to use with the LM!
Hi Jennifer, you’re welcome, glad it helped. I actually have a LM bread recipe to post. And yes I will take it out of the fridge and make some more things with it! Take care.
Hi, I started a lievito madre and have just completed the first 48hs. Now I saw that some mold (green and white) developed on top of the dried out skin… I was under the impression that I had left the jar cracked open. Do I have to start over? Or can I just use the inside of the ball?
THanks for your help!
Hi Wanda, I would just remove it, but check to make sure it hasn’t gone further down, then you should definitely start over, Is your house very warm? Try placing it in a cooler room. Let me know.
Hi I am into the last step so if I am not using I will have to store in my fridges. How long will be the next feeding?
Hi Edwin, it’s all written in the post, look under “When storing in the Fridge”. Hope that helps.
Thank you for explaining detail in building italian starter. I have a question about Italian starter. I read we need to give it a sugar bath in the maintenance of the LM to wash the acidity because it taste more sour? How often this procces has to be done and how to do it? Thank you for any explanation!
Hi Anna, so I had never heard of that before but this is what I discovered. Pour room temperature water (70F/20C) into a large bowl and add a pinch of sugar. Take your sourdough out of the fridge and cut it into pieces, then take each piece in your hands and press it lightly to release all the carbon dioxide that has formed inside before placing it inside the bowl. Do this for all the pieces then leave them in the solution of water and sugar for 20 minutes. After the time has passed, squeeze the pieces of yeast to eliminate the excess water and weigh them on a kitchen scale, then put all the pieces in a bowl and proceed with the refreshment (normally the refreshment is done with a hydration of 50%, but in this case, since there is still a little water that you used for the bath, I suggest you refresh it with a hydration of 40% or you could add 50% if you prefer, so for 100 grams of mother yeast, add 40 grams of water and 100 gr of flour). Leave it a couple of hours at room temperature before placing in the fridge. They do this not only for the acid balance but also to strengthen it. Interesting. I hope that’s what you were looking for. 🙂
Can you turn a already fermented sourdough starter into Lievito starter by hydrating it less and possibly adding in honey the first feeding?
Hi Nancy yes you probably could, but I think since it is already mature you don’t even need to add honey, just had less water. Let me know how it goes.
Just to confirm, it was meant to be 5 stars in my comment and not 4, it seems I really have to get a new iPad
Clicked “Reply” to your comment; didn’t do anything, so hope it follows your comment.
1. Have to start over. I got to Step 5 and found the dough had white, fuzzy growth, so threw the whole thing away. Wasn’t sure whether this was some harmless yeast. Could it have been because I placed a lid on and it became too moist?
2. I did measure using a scale. At first the dough is very pliable and easy to handle, however, it becomes VERY sticky prior to next step. Is this normal? How do you keep the dough from sticking all over your fingers, spoon—oil/flour your fingers?
Thank you.
Hi Elizabeth, yes just cover it lightly, you could actually cover it with a piece of plastic wrap, just drape it over the jar or bowl. And yes that’s perfect when it becomes sticky, use a spatula to remove it from the jar, don’t oil your fingers, if you do use your hands damping your hands with water will help with the stickiness. Let me know how it goes.
SO thankful you posted this recipe! I have been looking for something similar for awhile. While I understood it for the most part, your directions were somewhat confusing. For example, you state, “Remove 100 grams of the dough, it’s best to remove the top part of the dough, discard anything over the 100 grams…” Are you saying to remove and KEEP the top part of the dough equal to 100 gr.? Or remove (and discard) the top part of the dough while keeping 100 gr. for the next step? I have found that the top portion is dryer so I assumed it was to remove and DISCARD the top part. Please clarify. Thank you. Love your recipes.
Hi Elizabeth, sorry it was confusing but yes remove the top dry part to start and then keep 100 grams for the next step. I will change the wording. Let me know how it goes. Take care.
Very excited to try this and looking forward to the recipes to come featuring its use!
Thanks Regina, I added a focaccia recipe to the post, I will be posting a couple of more in the next couple of weeks. 🙂
Can you use maple syrup instead of honey or does it need to be honey?
Hi Clare, yes it should be honey and not maple syrup for this. 🙂
Just to follow up on your question, maple Sirup should work as well. Also, you could use the juice of a ripe apple, or soak raisins in water for a day or so and use some of the water for your starter.
Don’t be shy to try , eventually you are the lievito‘s boss and not vice versa😀
Hi Tom and yes I have also been told fresh grape juice also. Take care.
Hi, Rosemary. So there is no yeast in the starter? How does it rise? Or is it merely resting? Thanks.
Hi Pamela, it natural yeast and it rising over time.
Where is a bread recipe to use this starter in?
Hi Jackie, those are coming.