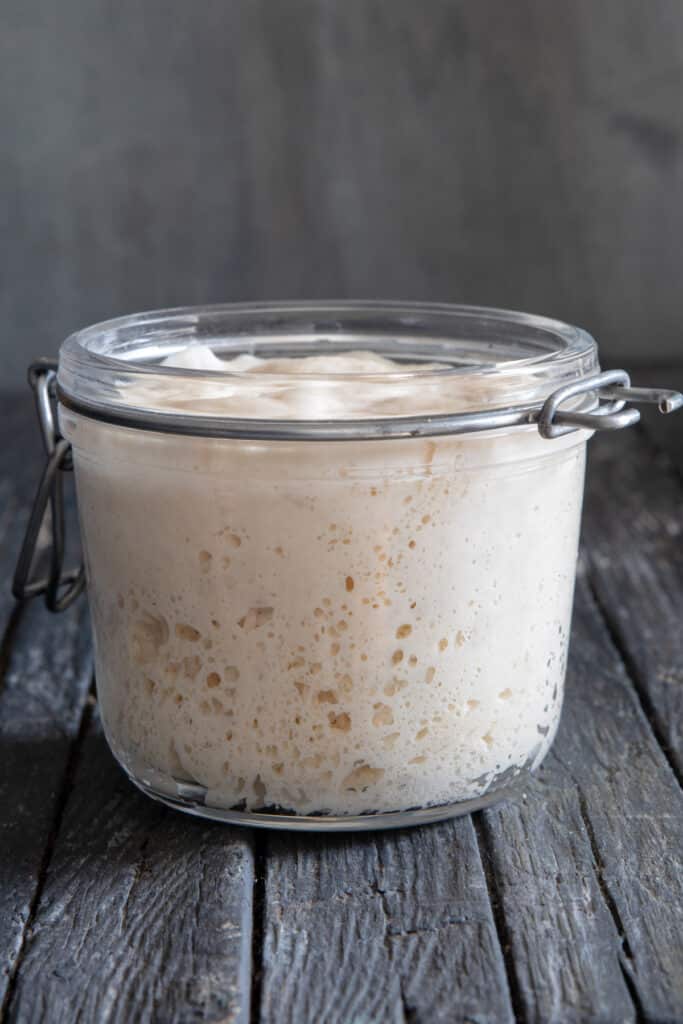
Italian Sourdough Starter – Lievito Madre
Italian Sourdough Starter – Lievito Madre Recipe is made a little bit different from the more well known version. This is a lower hydration starter which also takes longer to produce. But it is well worth it.
So after making a Sourdough Starter that most of us usually use, I decided that I wanted to also give the Italian version, Lievito Madre, a try. A friend explained how it is made, time is needed but it is very easy and straight forward.
what is the Difference between Traditional Sourdough Starter vs. Lievito Madre
When it comes to sourdough baking, there are two popular approaches: the traditional sourdough starter and lievito madre, an Italian-style fermented dough. While both are used to naturally leaven bread, they are different not only in hydration, but also flavor and maintenance.
Hydration Level – for traditional sourdough, starter is kept at 100% hydration, which it is fed with equal parts of flour and water by weight. The end result is a thick pancake like batter. Whereas the hydration level for lievito madre is much lower, usually around 50%, which means it is fed with two times the amount of flour than water. The end result is a stiff dough like consistency.
Flavor differences – the traditional sourdough starter has a tangy acidic flavor, whereas the lievito madre produces a milder and sweet flavor with less tang. This makes it perfect for making sweeter breads such as panettone and brioche.
Feeding the starter – a traditional starter is usually fed every 12-24 hours, of course this depends on the temperature and how often you bake. If refrigerated it can last up to a week without feeding. Mine has actually lasted a few months. On the other hand lievito madre should be refreshed every 4-8 hours during active baking time and kept in an airtight container, this helps prevent strength and prevents acid production.
Which should you use?
If you love rustic sourdough loaves with a strong tangy flavor and you like the idea of a more forgiving and easier process, then the traditional sourdough starter is for you. But if you are looking to bake not just everyday breads, but also enriched, festive breads with a subtle sweetness and light, fluffy crumb, then a lievito madre is your best choice.
How to make it
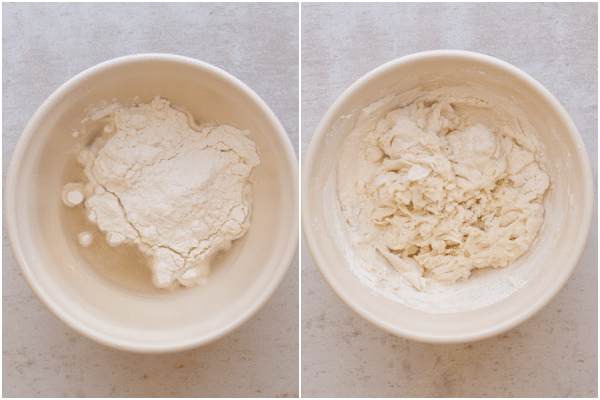
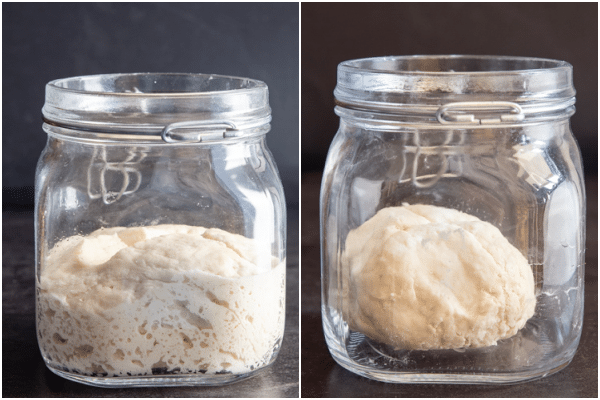
In a small bowl mix together the lukewarm water and honey, then add the flour and make a non sticky (but a little tacky) dough ball.
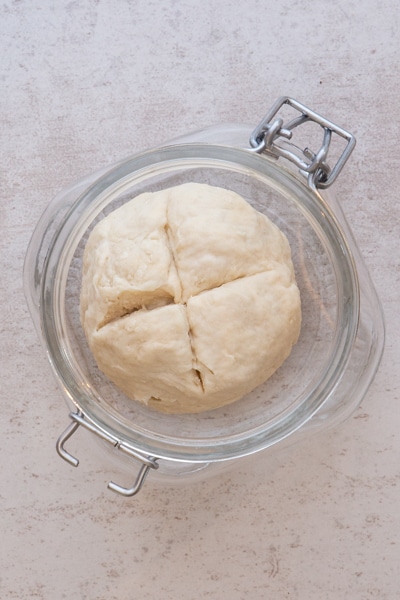
Mark with a cross. Then place in a large glass jar, place lid on top but do not close. Let sit in a warm draft free area for 48 hours.
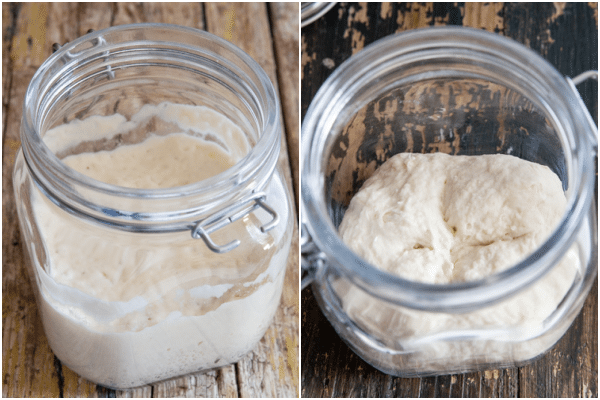
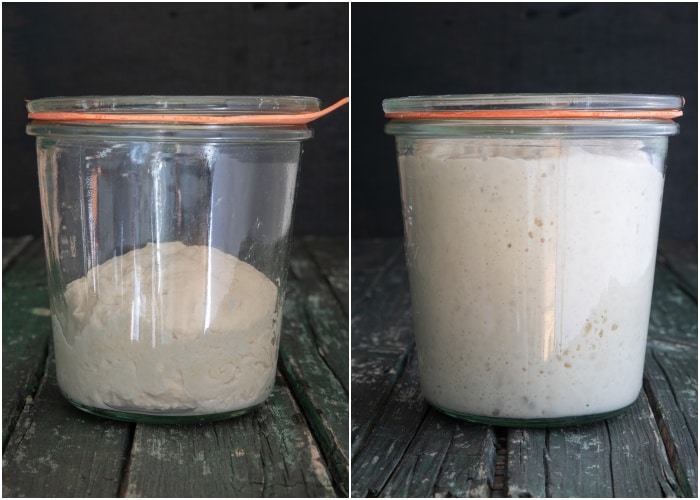
For the next four days, remove 100 grams of the dough, it’s best to remove the top part of the dough which tends to be dry, then keep 100 grams of the remaining dough (discard anything over the 100 grams), place in a bowl and add the flour and water, knead to form a compact dough, make a cross. Place in the jar (which has been cleaned, rinsed well and dried). Cover lightly and let rest again for 48 hours.
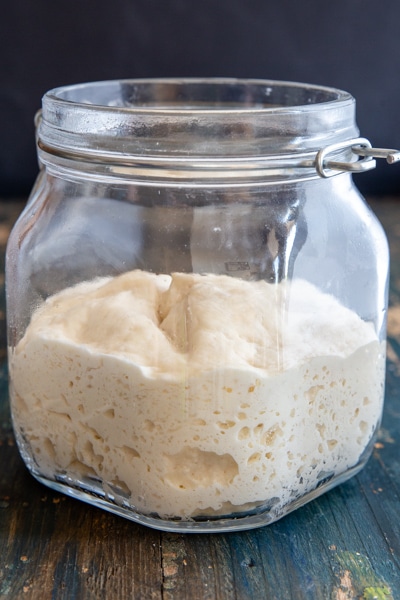
For the next 7 days remove 100 grams of the dough, it’s best to remove the top part of the dough which tends to be dry, then keep 100 grams of the remaining dough (discard anything over the 100 grams), place in a bowl and add the flour and water, knead to form a compact dough, make a cross. Place in the jar (which has been cleaned, rinsed well and dried). Cover lightly and let rest again for 24 hours.
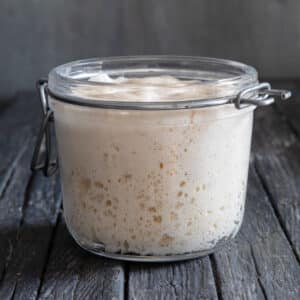
Ready to use!
What equipment do you need?
To get everything set up to start, you are going to need, a good quality all purpose flour or bread flour (unbleached), chlorine free water (bottled or filtered), a scale – because I think working in grams is best for bread, a thermometer and a large jar with a lid. The best jar to use is a glass jar with a lid, it’s best to have one that is large enough that you can stick your hand in.
Why is a Natural Starter a better choice?
A natural starter or sourdough starter gives a more intense flavour to your bread recipe. You will also have a better developed crumb, which helps the bread to grow in height rather than width. It also has a better shelf life, this is because of the level of acidity of the dough which tends to inhibit most of the moulds, it also keeps its aroma for a longer period and has a more appealing crust colour.
Some people find (me included) that it is easier to digest because of the transformation of the more complex substances into simpler ones, therefore it makes it easier for our bodies to absorb.
Why make a cross in the dough?
The cross, according to popular superstition, was used to bless the dough of bread and to drive out demons or evil forces that would have hindered the leavening. In fact, it is said that having received from the Pope, the order to bless the loaves, Saint Clare made the sign of the cross on them. So a little Italian superstition never hurt!
What to do when the starter is active
Once the starter is active the first thing to do is give it a name, yes people name their starters. Then you can refrigerate the starter especially if you plan on baking bread about once a week. If you plan on baking everyday then the starter should be kept on the counter. And fed once a day.
How to store the Lievito Madre
Store it in a clean glass or another container that is suitable for food, it should be at least three times larger than the starter. Leave it in the refrigerator until the next use, remember to refresh it every 5-7 days at the most if not using.
How to refresh the starter
Remove the starter from the refrigerator and leave it at room temperature for an hour, if your house is cooler, then extend the time to about 2 hours. Eliminate the top layer of the dough, which may be dry and crusty. Remove 100 grams, add 50 grams of water and 105 grams of flour. knead the dough until you get a compact dough.
Engrave a cross on the dough and place it in the clean glass jar. Let it sit at room temperature until it has doubled (3-4 hours) then place it back in the fridge.
What is the best room temperature for the starter?
The starter should be kept in a warmish room, the best temperature would be anywhere from 70 – 85F (21-30C). Although my house is around 18C and it works just fine.
how fresh should lievito madre be to use
The freshness of lievito madre depends on the recipe and how you intend to use it.
For Baking Bread or Enriched Doughs – The lievito madre should be active and refreshed before use, which means it has been fed and allowed to ferment at room temperature for 3-4 hours or until it doubles in size.
Signs of freshness in Lievito Madre – The appearance should be smooth and elastic and a little firm because of its low hydration. It should have a pleasant, mildly tangy aroma with no off putting smells or extreme sourness. After feeding, it should have doubled or even tripled within 3-4 hours at room temperature. If it hasn’t, then repeat the feeding until it does. You may need to discard some of the dough before re-feeding.
recipe tips
- If the lievito madre has been left in the fridge for more than 5-6 days without a feeding, then it is best to feed it 2-3 times over 1-2 days.
- If you are using it to make enriched doughs such as panettone or colomba or even brioche then be sure that it is well refreshed in order to produce a strong fermentation.
- Having a fresh and active lievito madre will give you the best results in all your baked goods.
If i feed my lievito madre at noon when will it be ready to use and for how long
Usually the lievito madre, in a room temperature around 68-72F/20-22C, will be ready to use 4-6 hours after feeding, it should double or triple in volume and have a mild pleasant smell. If the environment is above 75F/24C then it will probably be ready sooner, 3-4 hours. If your home is cooler (like mine) 68F/20C it could take 6-8 hours or longer to double.
You will know it’s ready when it doubles or triples in volume, feels elastic and soft with no dry or hard spots on it, it should have a mild, slightly tangy aroma. You can test it by dropping a piece of dough into a bowl of water, if it floats, it’s ready for use.
The starter will hold its peak for about 2-3 hours after doubling or tripling in volume. After 3-4 hours it may start to deflate slightly because fermentation will slow down. It can still be used but leavening might not be as strong.
For example if you feed the starter at noon, then it should be ready between 4:00 – 6:00 pm (depending on the room temperature). The best time to use it would be between 4:00 – 8:00 pm, right at its peak and slightly over.

recipe tip
If you don’t use it immediately when it’s ready, then be sure to refrigerate it after it reaches its peak this will help slow down fermentation. It can be kept in the fridge for up to 24 hours and you can use it directly from cold for most recipes. For enriched doughs such as panettone or brioche it always best to use a starter at its peak.
Why is the starter dough discarded?
The starter is discarded so that there is less flour needed to maintain it. If you just added the same amount of flour each time you refresh the starter (without removing any starter), you would eventually come to a point where the added flour is not enough to refresh the starter and it would starve. The starter is not a real starter until you have arrived at about step 9 or 10 and sometimes longer. It takes time for the organism balance to get established.
How Long Can Lievito Madre Discard Be Used?
For longer storage, freeze the discard in an airtight container or freezer bag. It can be kept frozen for up to 3 months. Thaw in the refrigerator before use. Discard kept at room temperature should ideally be used within 6-8 hours of being removed from the starter, as it will continue to ferment and may become overly acidic or inactive. Discard stored in the refrigerator can last for up to 4-5 days, provided it smells pleasant (mildly tangy but not overly sour or foul) and hasn’t developed mold or discoloration.
recipe tips
- If you’re using lievito madre discard in recipes like pancakes, waffles, crackers, or flatbreads (where leavening is less critical), it doesn’t need to be freshly fed.
- Discard that’s 1-3 days old, stored in the fridge, and still smells pleasant (mildly tangy, not sour or spoiled) is perfectly fine to use.
- Discard should not have any mold or an off color. A slight liquid layer (hooch) on top is normal and can be stirred back in.
What to make with discarded starter
Lots of people, me included, would rather not throw away food, (but unfortunately you will have to eliminate some of that starter at the beginning), and that goes for discarded starter. A fast and simple one is frying it, sprinkle with your favourite spices and fry in some oil. You could share it with friends once it is developed or you could make chocolate chip cookies.
I started to use the discard after day 10, or you could refrigerate it and keep adding the discard until you have enough for a recipe (recipes to follow). It is best used within 3-5 days.
How to substitute lievito madre for dry yeast
Approximately 5-6 grams of dry yeast or 12-15 grams fresh yeast which is equal to 100 grams of lievito madre. So if my lievito madre using 33 grams of water and 67 grams of flour, because of the 2 for 1 ratio of flour versus water, then you need to adjust your recipe by using 33 grams less water and 67 grams less flour. Of course rising times will also be longer.
recipe tips
- Be sure to feed your lievito madre before using in the recipe.
- Be aware of the hydration of the dough, if needed add small amounts of water or flour during mixing to achieve the desired dough consistency.
- You will find that there is a milder and more complex flavor compared to yeast-based doughs.
When to add extras to the dough
When adding extras such as nuts or even chocolate chips to a lievito madre dough it is best to add after the first rise, adding them too soon can affect the rise of the dough. Be sure to add them gently, this will help prevent damaging the dough’s gluten structure and will ensure an even distribution. Be sure to use only 15-20% of the weight of the flour.
How to add the mix-ins to the risen dough
Transfer the dough to a lightly floured flat surface and gently press the dough into a rectangle with your finger, the rectangle should be about 1/2 inch (1-2 cm) thick. Sprinkle the mix-ins on top of the dough, then tightly roll up the dough from the long end, then fold the dough like an envelope.
Gently fold the dough a few times to distribute the chips or nuts evenly, be sure you don’t over work the dough as this could disrupt the gluten development. Let the dough rest for 10-15 minutes, then shape into the desired form (loaf, rolls or boule). Cover and let the dough proof as per the recipe instructions.
recipe tips
- Be sure you don’t add too many mix-ins as this can make it harder for the dough to rise and bake evenly.
- Make sure that the nuts and or chips are well hidden in the dough so they don’t burn while baking.
- Try to chill or even freeze the chocolate (20-30 minutes) before adding to the dough, this can help it maintain its shape and prevent it from melting into the dough too soon.
- Be sure to spread the mix-ins evenly so that they aren’t clumped together.
Recipes with Lievito Madre
- Focaccia with Lievito Madre
- Rustic Italian Bread
- Lievito Madre Pizza Dough
- Click here for more recipes
- Lievito Madre Cinnamon Buns
- Lievito Madre Mother in Law Tongues
- Lievito Madre Discard Gingerbread Cake
- Lievito Madre Discard Pasta
- Lievito Madre Cruffins
If you decide to try this Italian Sour Dough Starter – Lievito Madre Recipe, I hope you enjoy it and let me know how it goes. Enjoy! I have quite a few more recipes to follow!
Italian Sour Dough Starter – Lievito Madre Recipe
Ingredients
STEP 1
- 105 grams all purpose or bread flour (unbleached)* (¾ cup + 1 tablespoon)
- 50 grams water lukewarm chlorine free water (85F/40C) (3⅓ tablespoons)
- 1/2 teaspoon honey
STEP 2 -11
- 105 grams all purpose or bread flour (unbleached)
- 50 grams water lukewarm chlorine free water (85F/40C)
*My daughter and I have discovered that a high protein flour (bread flour) with at least 14% protein is what the lievito madre grows best on. When using the LM for baking the type of flour can be the lower protein type of flour.
Instructions
STEP 1
- In a small bowl mix together the lukewarm water and honey, then add the flour and make a non overly sticky dough ball, it should be a bit tacky. Mark with a cross. Then place in a large glass jar, place lid on top but do not close. Let sit in a warm draft free area for 48 hours.
STEP 2
- Remove 100 grams of the dough, it's best to remove the top dry part of the dough, then keep 100 grams of the remaining dough (discard anything over the 100 grams), place in a bowl and add the flour and water, knead to form a compact dough, make a cross. Place in the jar (which has been cleaned, rinsed well and dried). Cover lightly and let rest again for 48 hours.
STEP 3
- Again remove 100 grams of the dough, it's best to remove the top dry part of the dough, then keep 100 grams of the remaining dough (discard anything over the 100 grams) place in a bowl and add the flour and water, knead to form a compact dough, make a cross. Place in the jar (which has been cleaned, rinsed well and dried). Cover lightly and let rest again for 48 hours.
STEP 4
- Again remove 100 grams of the dough, it's best to remove the top dry part of the dough, then keep 100 grams of the remaining dough (discard anything over the 100 grams), place in a bowl and add the flour and water, knead to form a compact dough, make a cross. Place in the jar (which has been cleaned, rinsed well and dried). Cover lightly and let rest again for 48 hours.
STEP 5
- Again remove 100 grams of the dough, it's best to remove the top part of the dough, then keep 100 grams of the remaining dough (discard anything over the 100 grams), place in a bowl and add the flour and water, knead to form a compact dough, make a cross. Place in the jar (which has been cleaned, rinsed well and dried). Cover lightly and let rest again for 24 hours.
STEP 6
- Again remove 100 grams of the dough, it's best to remove the top part of the dough, then keep 100 grams of the remaining dough (discard anything over the 100 grams), place in a bowl and add the flour and water, knead to form a compact dough, make a cross. Place in the jar (which has been cleaned, rinsed well and dried). Cover lightly and let rest again for 24 hours.
STEP 7
- Again remove 100 grams of the dough, it's best to remove the top part of the dough, then keep 100 grams of the remaining dough (discard anything over the 100 grams), place in a bowl and add the flour and water, knead to form a compact dough, make a cross. Place in the jar (which has been cleaned, rinsed well and dried). Cover lightly and let rest again for 24 hours.
STEP 8
- Again remove 100 grams of the dough, it's best to remove the top part of the dough, then keep 100 grams of the remaining dough (discard anything over the 100 grams), place in a bowl and add the flour and water, knead to form a compact dough, make a cross. Place in the jar (which has been cleaned, rinsed well and dried). Cover lightly and let rest again for 24 hours.
STEP 9
- Again remove 100 grams of the dough, it's best to remove the top part of the dough, then keep 100 grams of the remaining dough (discard anything over the 100 grams), place in a bowl and add the flour and water, knead to form a compact dough, make a cross. Place in the jar (which has been cleaned, rinsed well and dried). Cover lightly and let rest again for 24 hours.
STEP 10
- Again remove 100 grams of the dough, it's best to remove the top part of the dough, then keep 100 grams of the remaining dough (discard anything over the 100 grams), place in a bowl and add the flour and water, knead to form a compact dough, make a cross. Place in the jar (which has been cleaned, rinsed well and dried). Cover lightly and let rest again for 24 hours.
STEP 11
- Again remove 100 grams of the dough, it's best to remove the top part of the dough, then keep 100 grams of the remaining dough (discard anything over the 100 grams), place in a bowl and add the flour and water, knead to form a compact dough, make a cross. Place in the jar (which has been cleaned, rinsed well and dried). Cover lightly and let rest again for 24 hours.
STEP 12
- Ready to use!
Notes
Recipe Tips
I would use a jar at least 24 ounces (3 cups) or 680 grams. The dough ball should not be overly sticky although it will be a bit tacky. If it is too dry then add a bit more water. Different flours absorb water differently.How to convert regular starter to Lievito madre?
For example take – 100 g regular sourdough starter feed it with 200 grams strong flour (high protein) and 90 g lukewarm water, mix and knead into a firm dough, it should feel smooth, not sticky (a bit tacky), and hold it’s shape. After 8–12 hours (or when risen), take 100 grams from the centre (remove the top dry part), feed again with 200 grams flour and 90 grams of lukewarm water. Repeat the process after 8-12 hours. After 2–3 feeds it starts behaving like LM. After 3–5 feeds it becomes stable and ready to use.Nutrition
Updated from October 11, 2020
It’s All About Pasta
Amazing pasta recipes to make your mouth water!


Authentic Italian Desserts
75 Traditional Desserts Made Easy
Hi, how can I convert my current sour dough starter into LM? What are the necessary steps where I can jump into using my mature starter. My starter is a year old. I’m very interested in LM and am anxious to use it. Thank you for this wonderful info!
Hi Dolores, thanks so much, so to make a LM or stiff starter, take 10g of your existing starter and feed it with 50g of flour and 25g of water, you will need to knead it together instead of stirring. The next day, take 10g of the stiff starter, feed again with 50g of flour and 25g of water, again knead to combine. Repeat this for another 3-4 days. It will take time for the microorganisms to adapt. Hope that helps. Let me know how it goes. Take care!
This was my first ever attempt at LM. I love it, but have now so much, like most a kg.
I have made pizza, bread , focaccia and cookies. I just can’t discard, through out food , other than the dry part so I baked and gave starter away . Wish I could keep it longer in the refrigerator. Any suggestions , recommendations?
Thank you for your recipe .
Rosie
Hi Rosie, apparently after you feed it you can freeze it for up to a month. Or you could make recipes with it and freeze the baked goods. Glad you like it though. Take care!
With the 100 grams that are discarded 12 times , can these not be used to start another jars of LM.
I’m not clear on when the LM is ready for use and how much LM is needed to bake say a pizza.
This is my first attempt.
Thanks
Rosie
Hi Rosie, you could make another jar, but you’ll end up with so many jars. The LM is not ready to use until step 12. That is when it is ready to make bread or pizza. Everything you need to know and when to use it and what to make is actually written in the blog post. Let me know. Take care!
Thank you so much for this recipe! My sourdough is finally nice and strong. I’m going out of the country for 2 weeks. Is there anything i can do to save it since I won’t be home to feed it?
Hi JJ it should be fine in the fridge, although when you get back you may need to refresh it a 2-3 times. I have left mine for over a month and it was ok. Take care!
Thank you!!!
Hi JJ You’re welcome.
Can you use your existing starter and convert it to Lieveto Madre?
Hi Trina, yes you can, you need an active starter, this site explains everything that you need to do https://www.pantrymama.com/pasta-madre/. Hope it helps. Take care.
Hello Rosemary,
I contacted you last January asking if your Lievito Madre recipe was suitable for panattone. I did not make one then. But I now have one that I started on 31st Decrmber. It is now one month old and triples in size every day following a feed. Do you know if it is likely to be too acidic at this stage. I am not sure if I should try a bagnetto or how to do it. The only information i can find is how to do a bagnetto when LV is stored in water or wrapped in a cloth. I would very much appreciate your advice.
Rena
Hi Rena, apparently a bagnetto is done if the the LM is too acid.Throw away the outer part of the LM, the one that has been most in contact with impurities and air. With a knife, cut the LM into slices about 1cm, a little less than 1/2 inch thick. Then immerse the slices in fresh water (at a temperature of about 20C/68F) to which you add sugar or honey, useful for counteracting the acidity of the sourdough; the doses of sugar or honey must be about two grams/1/2 teaspoon for a litre/4 cups of water. Leave LM in the water and sugar for about 15-20 minutes. Do not leave it to soak for more than twenty minutes or you risk losing the specific properties of the yeast. So remember to bathe only if your mother yeast has acidity problems, it is unnecessary if the mother yeast is fine. Once twenty minutes has passed, take the mother yeast out of the water and squeeze it very delicately. The next step is to weigh it, since the quantities of flour and water to be added are then obtained from its weight.You will have to add 50 percent more flour than usual. So for example 100 grams of yeast, you have to add 150 grams of flour. The yeast, feeding on the starches of the flour, will strengthen itself and begin the leavening process. On the other hand, the water to be added in this refreshment must be calculated by eye, since you cannot know exactly the quantity of water present in the mixture after the bath and the subsequent squeezing.Let your LM rest at room temperature and then add it to your doughs.I hope this helps. But to tell the truth I have never had to do this. Let me know.
Rosemary, it’s all your fault for mentioning Cazzottini in one of your recipes that I read yesterday! Curious, I did a search and ended up on an Italian site which gives a recipe. She mentions ‘refreshed and lively sourdough’, and in one of her pictures with all the ingredients, there is a bowl with a lump (for lack of a better word) of dough with a cross cut in it. So, am I correct in thinking this type of starter is what she may be referring to? (Yes, I know asking you about another’s method and recipe, but this was all thanks to Google Translate.)
Any way, I am going to start this today and will incorporate it in my baking. Currently, I’ve dried powdered sourdough starter I re-hydrate and feed a couple days before baking with it. It’s where I like it for taste, and since I don’t use it every week, it works best this way.
By the way, I told my husband yesterday I found a new love…your site. There are so many recipes I’ve marked to add into menu planning!
Hi Mari, thanks so much, funny thing is I restarted a new Lievito Madre today because I have a few new recipes I want to make. I hope you enjoy the recipes. Take care.
Can’t wait to hear about the new recipes, Rosemary.
I do have a question about the starter. I’ve started it and it’s really actively and doing beautifully. Problem is, on Day 12 it will get the morning feed and later on we will be having to travel to another part of the country to attend my father-in-law’s funeral. I will miss DAY 13 feed and Day 14 will be later in the day.evening when we get home.
Will it be all right to miss out the day, or should I refrigerate it until we get home? At this late stage, I don’t want to muck it up.
Thanks.
Hi Marri, condolences for your father-in-law. If you can try and feed it just before you leave on the day 12. I wouldn’t refrigerate it but maybe put it in a cooler part of the house and it should be fine. Feeding it later on day 13 won’t hurt it. Let me know how it goes. Take care.
I am always baking in larger quantities of bread and in fact i am looking at a specific recipe that calls for 500g of lievito madre. How exactly do I get to that quantity and still have a sizeable quantity available for a bake the following day or two?
Thanks
Hi Mike, you will have to keep feeding the amount you have until you reach the amount that you need for the recipe. Hope that helps.
So presumably without discard at some point? Alternatively are you suggesting an additional feed in the same proportions only larger such that the following day after feeding we’d have our 500g total plus 150g remaining to keep feeding ?
Hi Mike, exactly that. Let me know how it goes.
Hi
My lievito madre is 8 Months old and strong. I used your recipe so thank you. My question is when using LM from the refrigerator. So there is the LM you need for your recipe and the LM that you put back in the refrigerator. Could you take me through the steps for example let’s say you have 200 grams of refrigerated LM ( after hard is discarded)? Let’s say I need 100 gms for the recipe. How do I refresh the LM for the recipe and How do I refresh the rest to refrigerate. Do I refresh it all together and just cut off a piece for the recipe?
Hi Steven, so if the LM has been in the fridge for less than 2 weeks – I would half the dough so I would feed the 100 let it sit, then remove 100 for the recipe the remainder I would refrigerate. Now the 100 from the halved dough, is now discard and I would probably make something with it. (eg crackers) or you could toss it. Or you could feed the whole 200, then remove the amount for the recipe and refrigerate the remaining dough. Hope that helps.
Hi Rosemary,
Thank you so much for writing such an in-depth guide to making a lievito madre. I have read through this several times, but unfortunately am still quite confused about some of the steps because this is my first time doing it.
If I make the starter and keep it in the fridge (after it’s to the point where it’s ready to use), I have to feed it every 2 weeks (at a minimum) correct? Then, when I actually want to use it, I have to “refresh it” by adding flour to the starter (1:1) and then half of water and a quarter teaspoon of honey. Since I’d be leaving this in the fridge, it says I have to repeat this process 1-2 times. But then I would be left with so much dough wouldn’t I? I guess it depends on how much of the starter I need for the recipe I’m using. Also, after refreshing, how long do you let it rise for? Are you aiming for it to double? Then, do I take some of it after I’ve refreshed it to save for future uses? Or do I take some and feed it first, and then refresh the remaining starter?
I just started it today and am excited! Thanks!
Hi Hanna, if you feed the the starter every 2 weeks and don’t use it, then you really should discard part of it or use the discard to bake something. If you do feed it every 2 weeks, then 1 feeding should be enough and yes it does depend on how much you use for the recipe. After you have fed the starter it should be left to rest/rise for 4 hours, then it will be ready to use, it should have almost doubled or even doubled. Then you take what you need from that for your recipe and the remaining is placed in the refrigerator for the next time. So for example you weigh your starter and you have 200 grams, for the recipe you need 100 grams, so I would remove 100 grams feed it with 100 grams flour and 50 grams water, form a dough, let it rise for 4 hours remove the 100 grams for my recipe and the remaining refrigerate. The 100 grams left from the beginning I could make something with it (discard recipe) or refrigerate it and keep it for the next time, although refrigerated discard will only keep for 1 week. Hope this helps, let me know.
Hello Rosemary, I am hoping to use your recipe for Lievito Madre. But I need to know that it is suitable for Panettone. Many thanks,
Rena Alexander
Hi Rena, if you plan on using a lievito madre for the pannettone then yes this is suitable.
When I print the formula, it shows step 4: 24 hours. In your main instructions, you indicate 48 hours. It may not be hugely important, but if it is, which is correct? (Thanks for all this great info.)
Hi Judy, thanks so much for letting me know, I corrected it. Have a great week.
Hello!
Sorry but how do you use it after it is ready?
Let’s say I wanna make bread with 500g of flour…. How do I know how much pasta Madre I need?
Also does it tastes the same as regular sourdough?
Thanks for the recipe!!
Hi Andrea, thanks, at the bottom of the post there are a few recipes that use lievito madre. It is the same taste as regular sourdough starter, it’s just a firm starter rather than a more liquid one. Hope that helps.
Tha ls for the reply! Somehow I was expecting a bland flavor compared to liquid starter.
I already checked some recipes! I think I’ll get started tomorrow with the mama and hope it’ll go well!
Hi Andrea, I don’t find it bland at all, I just prefer using a liquid starter, I find it easier to work with. But you might like it better. Let me know.
Question: can you use this Lievito Madre in place of a 100% hydration starter for basic sourdough breads?
Hi D, yes you can although because it is a stiffer starter you will have to add a little more water, but add 1 tablespoon at a time, so it doesn’t get too watery.
Thank you for this recipe. The one question I have is once it’s active and you refrigerate it do you continue to put in a jar covered lightly or do you seal the jar.
Hi Steven, I cover it well, so it doesn’t dry out. Have a great weekend.