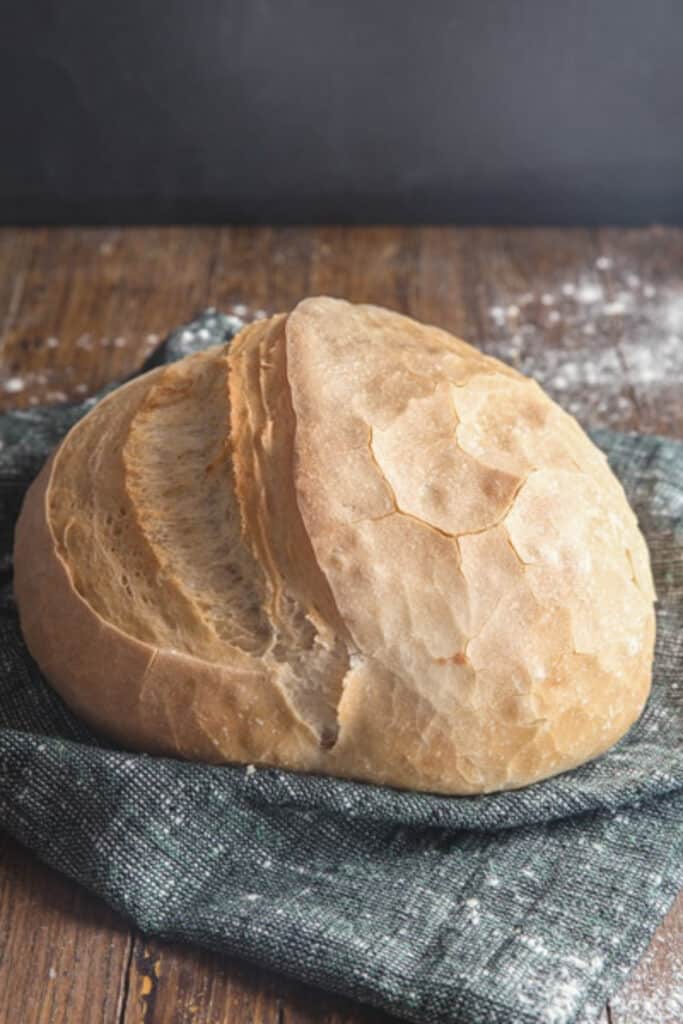
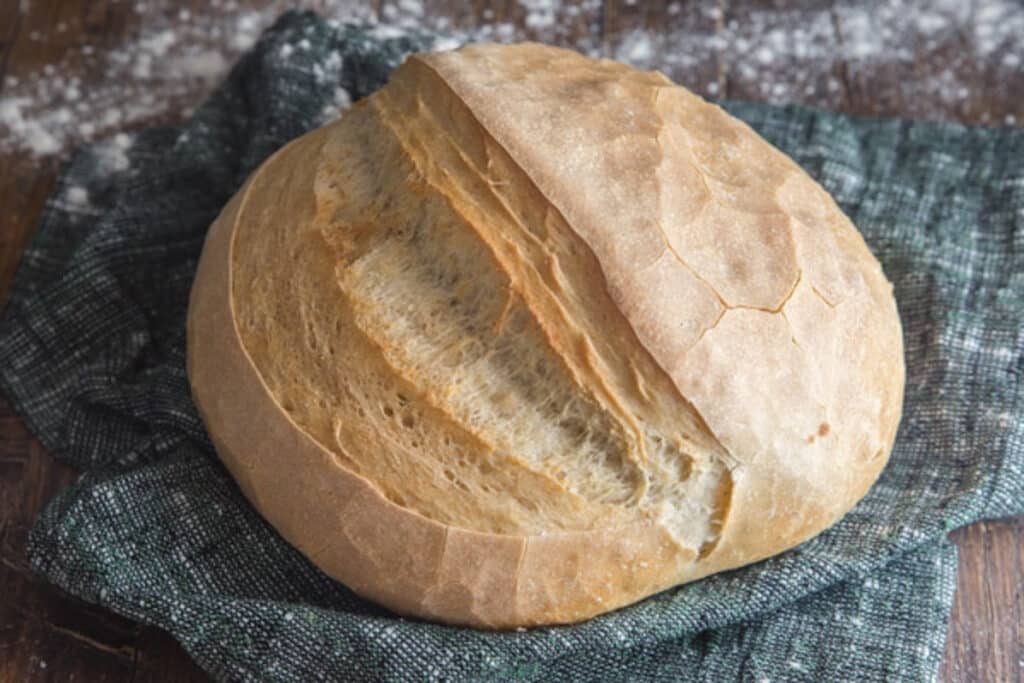
Homemade Italian Bread
Nothing like fresh bread out of the oven, especially if it’s Homemade Italian Bread. This traditional Italian recipe does take time, but believe me it is worth every second of it.
Serve it with your favourite stew or soup or why not grab a slice just because. I love to serve a few slices with my Thick Italian Beef Stew or my Beef Stew with Peas.
I remember the days when my mother-in-law would take her baskets of freshly risen dough down to the wood burning oven and make her amazing Bread and Pizza. Those were certainly the days!
But now I love to get my hands (or my mixer) dirty with flour and make my own Italian Bread. This is the traditional way, with a Biga to start. The taste is amazing and yes even the Italian was impressed!
How to make Homemade Bread
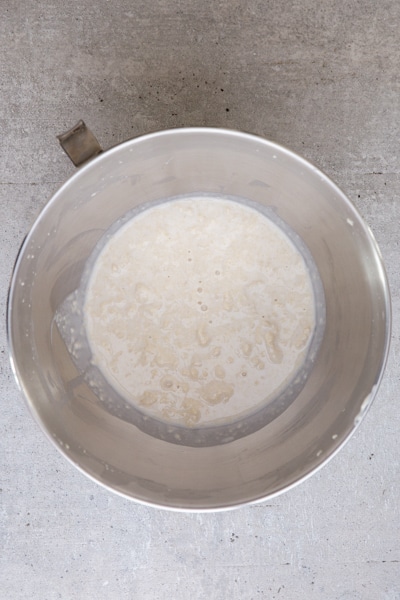
- To make the Biga – In a large bowl add the water and yeast, let sit five minutes then stir to combine.
- Add the flour and stir just until the flour has absorbed all the water. Do not form a dough.
- Cover the bowl with a clean tea towel, place in a warm draft free area and let rise.
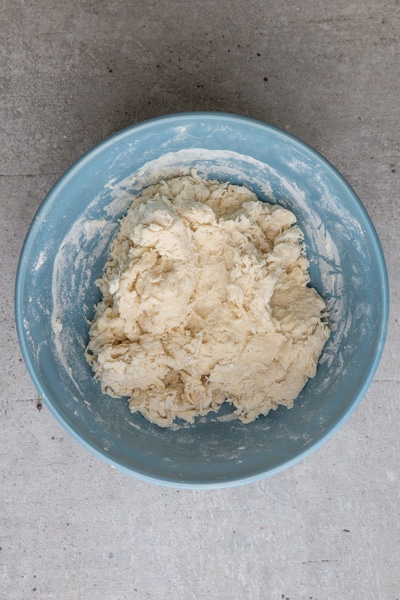
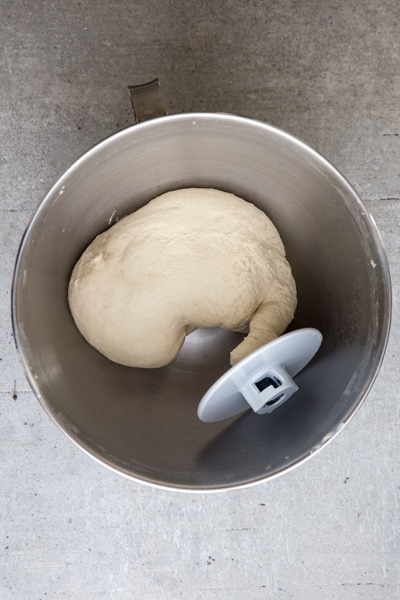
- Once the time as passed, in the bowl of the stand up mixer add the Biga and add part of the water, combine with a spatula.
- Add the flour, yeast, salt and the remaining water.
- Start to knead the dough for about four minutes or until the dough starts to pull away from the sides of the bowl.
- Move the dough to a lightly floured flat surface and knead to form a smooth dough ball.
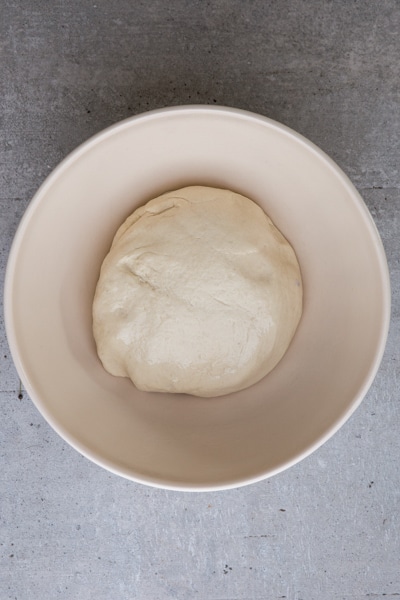
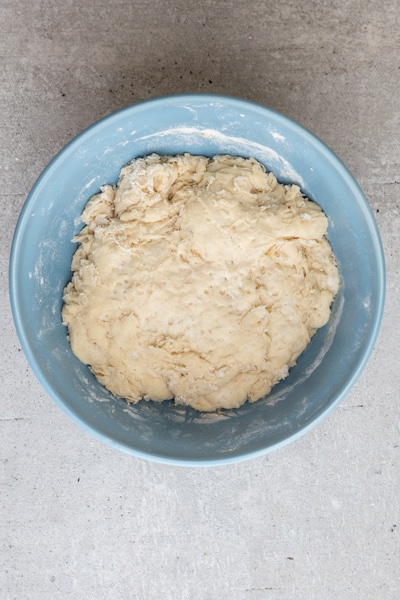
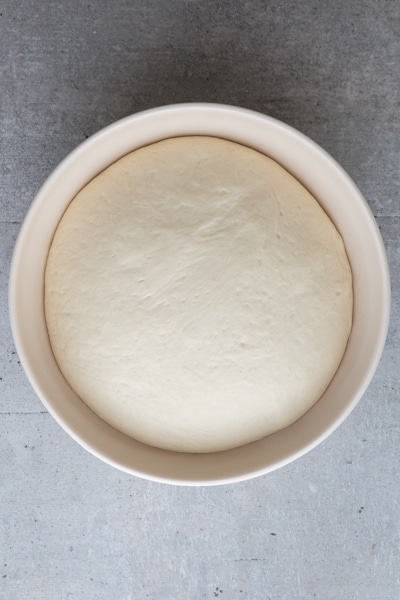
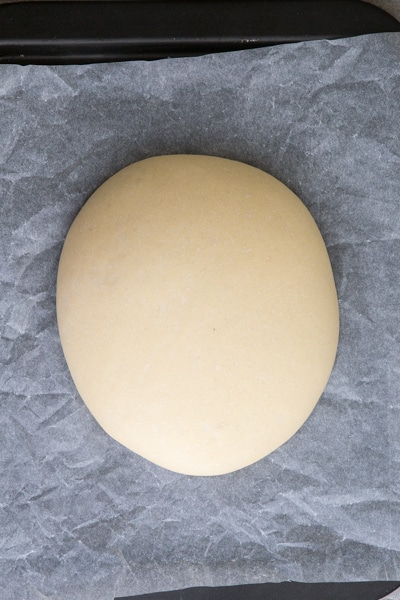
- Place the dough in a lightly oiled bowl, cover with a towel and let rise.
- Form the dough into a round or long loaf or even small buns.
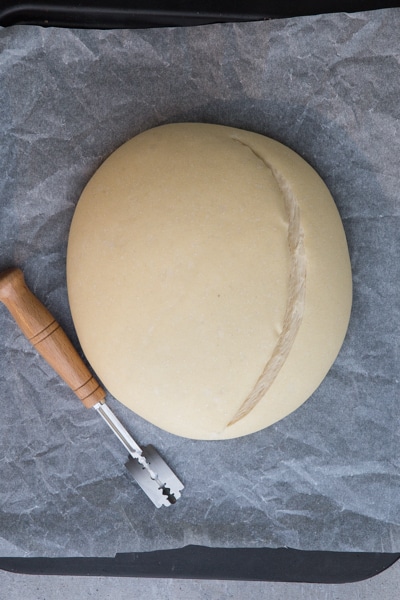
- Place on a parchment paper lined cookie sheet.
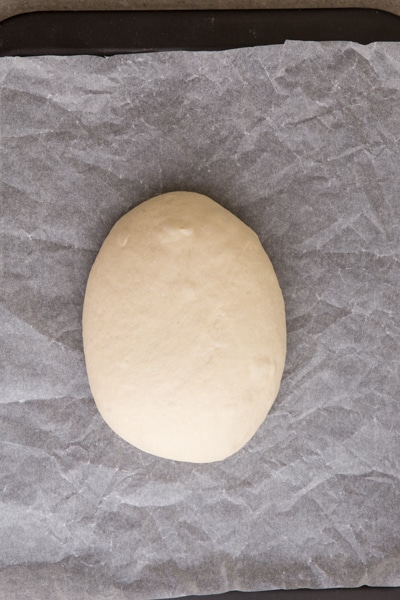
- Cover and let rise.
- Place a pan of water on the bottom of the oven.
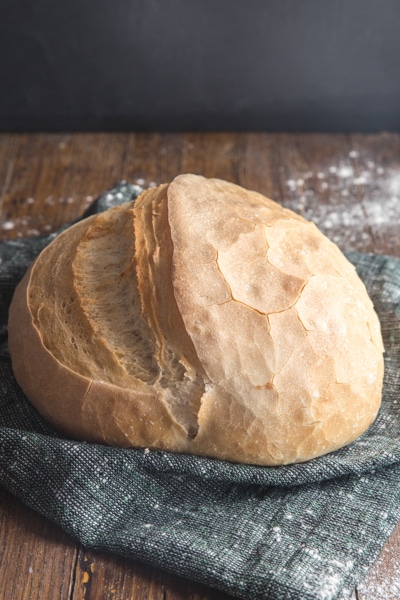
- Make a score in the bread and bake.
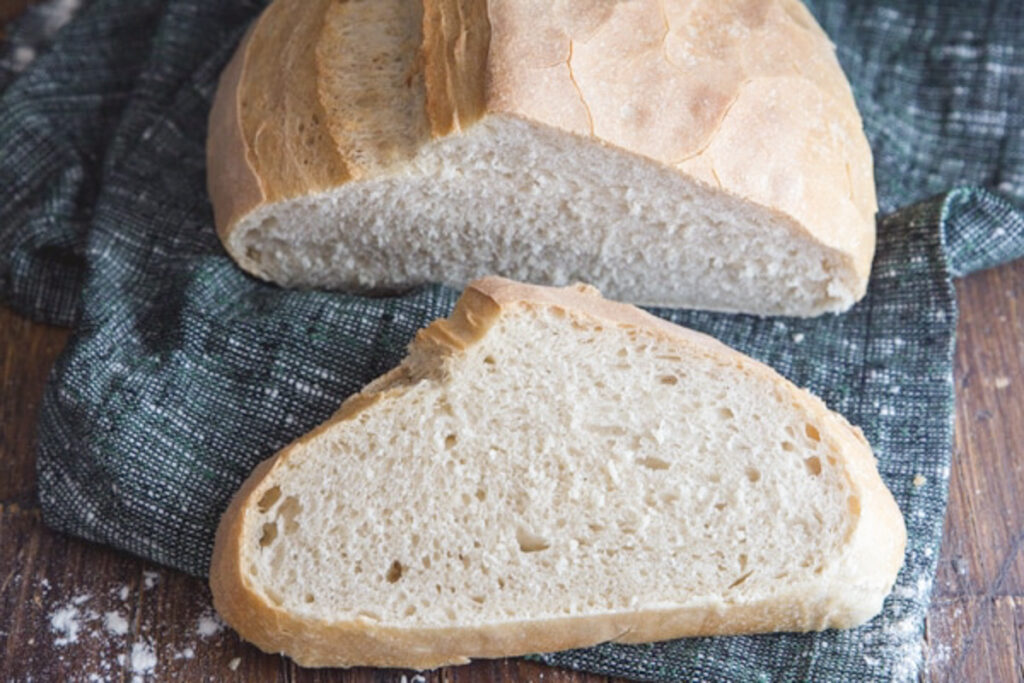
- Remove from the oven and immediately place the loaf on a wire rack to cool. This keeps the bottom from becoming soggy.
What is a Biga?
You may think that a Poolish and a Biga are the same, but the main difference is that a Poolish is a liquid dough and a Biga is a solid dough.
A Biga is a type of rise used in Italian baking. Many popular Italian breads, including a ciabatta and Pandoro, are made using a Biga.
The addition of a Biga is said to add more flavour to the finished product and is also used in breads that need a light, open texture with holes.
Is the yeast active?
The yeast you are using could be old or dead, to tell if the yeast is still active, in a small bowl add a 1/2 cup of water, sprinkle 1 1/2 teaspoons of yeast and a pinch of sugar over the top, stir it up, then let it stand for about 5 minutes.
If the yeast is still active, it will dissolve completely into the water and the liquid will start bubbling.
Make sure your water isn’t too hot or too cold. Too hot and you will kill the yeast, too cold and it will take a long time for the dough to rise. The perfect temperature is 100-110F.
Why do you need to place a pan of water in the oven?
The water in the pan will create steam which helps keep the crust soft. It also lets the bread to continue expanding freely. The steam that settles on the exterior of the bread also helps to dissolve the sugars in the dough.
Bread Flour or all purpose?
I personally use all purpose but if you prefer bread flour works just as well, some people swear by it. It will give your dough a chewier and denser bread.
How to score it
I love the look of a beautifully scored fresh loaf of bread. I discovered an interesting video on the different ways to score bread, you might want to check out the Foodgeek if you need an idea.
How to store the bread
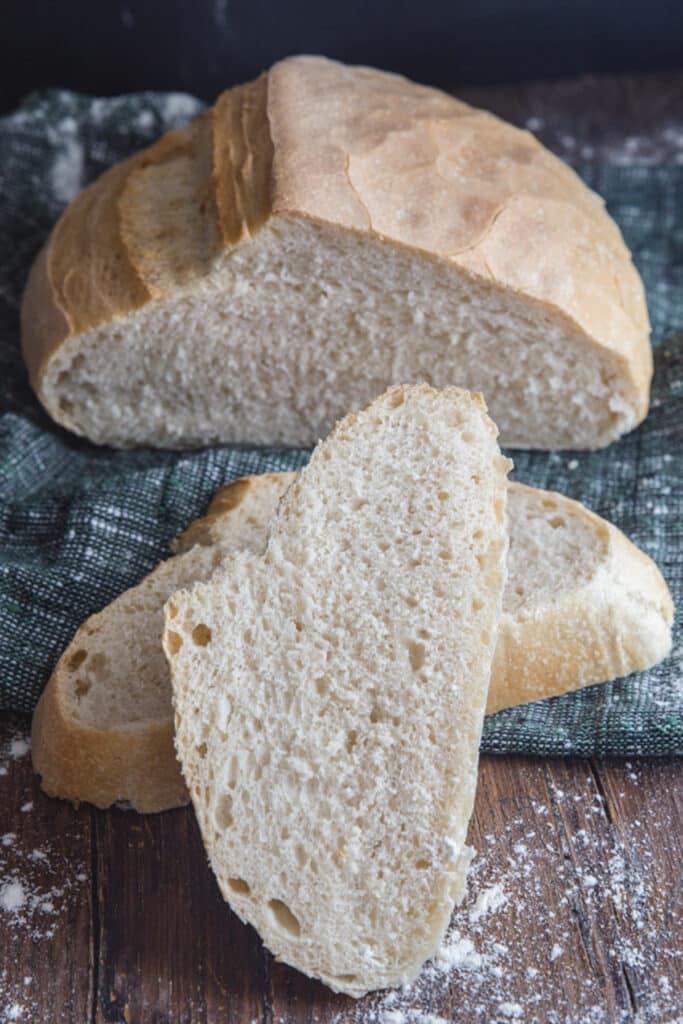
Cool the bread completely, then store it in a plastic airtight bag, storage container, wrap in foil or the Italian way and, place the loaf in a paper bag then place it in a plastic bag and close tightly. It can be kept at room temperature for about two to three days.
Can you freeze it?
Yes you can freeze it, let the loaf cool completely, then you can either slice it or leave it whole. Be sure to wrap tightly with foil or freezer safe wrap and then place it in a freezer safe bag or container. Properly stored, it will last for about 3 months.
Different types of Italian Bread
Apparently there are over 250 different types of bread in Italy that are actually made today. I certainly haven’t tried even close to that many, but a few of are favourites are a Ciabatta, Genzano, Lariano and the Italian can never pass up a Cazzottini or two.
More Delicious Bread Recipes
- Fast & Easy No-Knead Bread
- Easy Bannock Bread
- Traditional Italian Focaccia Bread
- Italian Ricotta Parmesan Bread
- Italian Fisherman’s Bread
- Italian Cream Bread
Probably the most famous saying in Italian referring to bread is “fare la scarpetta” which means “make the little shoe,” it refers to a small piece of bread used to mop up the last of the sauce on your plate. So remember to leave some sauce next time.
So if you are ready and have the time why not make a loaf of Homemade Italian Bread? Let me know how you like it. Enjoy!
Homemade Italian Bread
Ingredients
FOR THE BIGA
- ½ cup water (lukewarm)*
- ¾ teaspoon active dry yeast
- 2 cups all purpose flour
FOR THE DOUGH
- ¾ cup + 1 tablespoon water (lukewarm)* divided (200 grams total, if you want to double the recipe double this amount)
- 2 cups all purpose flour
- ½ teaspoon active dry yeast
- 1¾ teaspoons salt
*lukewarm water temperature should be between 100-110F (38-43C)
Instructions
FOR THE BIGA
- To make the Biga – In a large bowl add the water and yeast, let sit five minutes the stir to combine.Add the flour and stir just until the flour has absorbed all the water. Do not form a dough ball.
- Cover the bowl with a clean tea towel, place in a warm draft free area and let rise 18-20 hours.
- Once the time as passed, in the bowl of the stand up mixer add the Biga and ¼ cup + 3½ tablespoons (112 grams) water, combine with a spatula.
- Add the flour, yeast, salt and the remaining water (¼ cup + 1 tablespoon / 88g). Start to knead the dough for about four minutes or until the dough starts to pull away from the sides of the bowl.
- Move the dough to a lightly floured flat surface and knead to form a smooth dough ball.
- Place the dough in a lightly oiled bowl, cover with tea towel and let rise for two hours.
- Form the dough into a round or long loaf or even small buns whichever you prefer. Place on a parchment paper lined cookie sheet. Cover again and let rise for two hours.
- Pre-heat oven to 425F (220C). Place a pan of water on the bottom of the oven.
- Make a score in the bread and bake for about 20-25 minutes. Remove from the oven and immediately place on a wire rack to cool. Enjoy!
Notes
Nutrition
It’s All About Pasta
Amazing pasta recipes to make your mouth water!

Authentic Italian Desserts
75 Traditional Desserts Made Easy
Rosemary, thank you for pointing me in this direction for the bread. It is exactly what I was looking for.
I’ve been unwell the last three weeks, have basically been unable to eat. I made this for my husband to have in the evening, but the smell and how beautiful it looked made me savour the first cut piece (the crust which I love). It went down so easily with nothing on it, that I had a second slice…then later a third. Hadn’t eaten so much in over a week! Husband told me he better get stuck in before I ate it all. 😉
I see so many possibilities for this bread – including making long rolls for Chicago-style Hot Italian Beef Sandwiches. Can not wait. Bruschetta, here we come.
As well as, skip the spaghetti, and give me the bread and sauce. Yes, I am a Philistine! 😉
Your recipes never disappoint, especially this one; thank you again.
Hi Marri, thanks so much, so glad you ate the bread, nothing like homemade bread. I hope you are feeling better soon! Take care.
Hi Rosemary, thanks for all the great recipes. I first made this bread during the COVID lockdowns in the UK when strong bread flour was impossible to buy. I’d never made bread with standard “plain” flour. It was a revelation, especially using a biga.
I searched for the recipe again this week after a couple of years of making bread with different recipes and made a half and half blend of triple 0 flour from a local European foods store and wholemeal strong flour. It’s made lovely, tasty loaves that slice really well, even straight away when the bread was cooled after baking.
One thing though, the recipe is still saying use 200g of water in the second stage when choosing a multiple amount of the mixture. I realised that it was wrong because I had used the recipe before and also read a previous comment that pointed out the error. It doesn’t seem to have been altered as in your reply. I made a double quantity and added 400g.
Hi Dawn, thanks glad you enjoy the recipe. The recipe card won’t change with adding the tablespoons, that’s why I wrote 200 grams total, if you want to double the recipe double this amount (in the notes) for that reason. I know it’s not very convenient but there is no other way around it at the moment. Sorry about that.
Hi Mary
It looks like your measurement descriptions for water in the dough are incorrect. You mention the dough requires 200g total. But in the instructions, your math for the divided water doesn’t add up. Just FYI.
Hi Shaun, thanks, it’s been corrected. Take care!
Oh my this bread is unlike any other that I have tried to make. It is exactly what I have been looking for. Firm outer crust, soft inside. Delicious!!!
I have a question about doubling the recipe. Do I double the biga when I double the dough? I do see a note about water amount for doubling the dough. This may be a no brainer question but I would rather ask then mess up the bread.
I did not see exactly this question/answer in the comments. Thank you for your help.
Hi Jan, yes you should also double the biga too, so glad you enjoyed the recipe! Take care.
Hi Rosemary
I just put the biga together but was surprised by how dry it is. I didn’t try this but it’s so dry that I wouldn’t be able to form the mixture into a ball that would stay together. Is this normal?
Thanks
Gord
Hi Gord, yes this is normal, it isn’t supposed to be formed into a ball, just cover the bowl and then it is mixed into the remaining ingredients as per the recipe. Hope that helps. 🙂 Take care!
I checked the biga after 17 hours and it’s dry and crusty on the upper surface. It doesn’t appear normal. Your thoughts?
Hi Gord, just continue and it should be fine. Let me know.
Hello Rosemary,
Your Italian bread recipe is my go to for bread. The loaves are perfect every time. I’m wondering if some olive oil can be added to this recipe to give it an extra day of freshness. I’ve never been happy with the loaf after it sits for a day.
Hi Suzanne, thanks so much, so glad you like it. I think you could add olive oil to it, I think a 1-1 1/2 tablespoons would do. If the dough seems too wet then add a bit more flour. Let me now khow it goes. Take care!
Hello Rosemary,
I added 1 and a half tablespoons of olive oil to the dough. It has vastly improved the quality of the loaf on the second day.
Hi Suzanne, good to know, thanks. Take care!
i’ve got to tell you rosemary, i love this basic recipe, i’ve been using it for more then a year and its become my go to recipe replacing my french sourdough recipe for regular bread around the house. I typically double the recipe and make three small boules. I have been playing around with the recipe a little since i have been working some higher hydration doughs and have been settling in on a couple of modifications.
1. i’m using a slightly higher hydration biga 55% vs 48%
2. 425g H2O instead of 400g
so basically a 70% hydration dough instead of 65%.
I use kign arthur artisan flour and substitute 50g of whole wheat flour in the dough
I’ve added a little malt syrup a few times, it gives a nice brown crust but not necessary.
instead of a straight rise, i do a few folds every 30 minutes during the first rise, this helps with the gluten formation a lot
last thing is i cut down the yeast to 1/4t for the dough and 1/4 t for the biga, a little longer rise but helps with the gluten formation. I use instant (SAF red) rather then active dry yeast
I’ve been baking boules in a lodge dutch oven for several years and use that for the baking 480 for 16 minutes with top on then 15-18 minutes with top off.
Again, this is a wonderful basic recipe as written, the mods I have made give you a little more irregular crumb but its certainly not necessary. these really high biga recipes bring back lots of memories of the italian bread I ate as a child when my family spent several months in italy in the early 60’s.
Hi Chet, thanks glad you like the recipe and thanks so much for letting me know how you use it. I really appreciate that. Take care!
I was so pleased to find your site! I’ve been baking sourdough bread for 30+ years – but when we moved cross-country, I lost my sourdough starter. It produced a mild sourdough flavor with a crisp crust and good ‘chew’. Unfortunately, I’ve never been able to reproduce that starter, using the same methods that I had used previously. I assume that the ‘wild yeast’ in Missouri is different that that in Omaha.
I decided that the best alternative would be Italian bread – using a biga – and was delighted to find your wonderful recipes.
I’m 83 now, and love to cook and bake, but I’m not as strong as I used to be. I use a Zojirushi bread machine to mix and knead the dough, then bake it in the oven.
It appears that I can make the biga the night before, then in the morning, mix it and the rest of the ingredients together in the bread machine, let it go through the kneading and rising cycles, and finish off in the oven. The standard dough setting mixes for a few minutes, then kneads, rises for a little while, kneads again, then has one last rise before it’s ready for the oven. IS THIS TOO MUCH KNEADING? There is a ‘short’ dough cycle that doesn’t knead as long, if you think that might be best.
About the biga: Can you make a ‘double batch’, let it rise, ready to use, then freeze half for next time? I’m used to making sourdough, and can have 2 loaves of bread ready 1 hr 30 min after I start dumping ingredients into the machine. If I had a ‘standby biga’, I could have good Italian bread almost as quickly.
If I bake once a week, could I make the biga, then treat it like a sourdough starter – with water added to make it like pancake batter or thick gravy, then kept in the fridge (with a feeding) for a couple of days until ready to bake – and use this ‘liquid biga’ as a substitute for the sourdough starter I used to have? I know it won’t be as ‘authentic’ tasting as your recipe – but I can save your version to make when I have a couple of days to play in the kitchen! Thanks for your help.
Linda
Hi Linda, thanks so much, so glad you like the sight. Sorry you lost your sourdough starter! As far as the machine goes, I would try both methods the faster kneading and the regular (I don’t think it would be too much) and see which you prefer. And freezing the extra biga is a good idea. I have never thought of using the biga as a sourdough starter, it might work. I have a sourdough starter with a bit of yeast to start it off quickly that I use a lot https://breadsandsweets.com/sourdough-starter-with-yeast/, you might want to check that out. If you do try the biga as a starter let me know how it goes. Take care!
I made the Biga from a different recipe and was cautious using your recipe because I read “somewhere” that Biga could be left for a short time or a longer period. I left my biga for a good 24 hours. and then I used your recipe for making bread. And I am so happy with the loaf. Next time, and there will be next time, I shall follow your recipe from biga to sandwich.! Thank you for sharing your tasty recipe!
SO nice to meet another Rosemary!
Hi Rosemary, thanks so much, so glad you liked the recipe. And yes nice to meet another Rosemary. Take care!
When I tried the biga as written using cups instead of gms the biga was unusable. When I looked at the recipe further I see the gms of flour is 250gm which is really only 1 cup of flour. I will give it another try using the weighted measurements. Would you say this assessment is correct?
Hi Donna, it works with both, I have both cups and a scale, one cup of flour is 125 grams not 250. 🙂
I just took this out of the oven and it’s a beautiful loaf! The flavour of the flour has developed in the biga and the crumb is beautifully soft. It’ll make the perfect jam sandwich. I needed a little extra water in my biga as it was too floury, but that’s only to be expected here in the UK. Wonderful recipe that I will use time and time again. Thank you, Rosemary 🙂
Hi Tina, thanks so much, so glad you enjoyed it, and yes sometimes the flour does need more water or even sometimes more flour. Take care and have a wonderful Sunday!
How can you modify the recipe if you don’t have a mixer? Thank you.
Hi Shelley, well instead of kneading with a machine you will knead by hand, which can take about 12-15 minutes. Hope that helps.
I’m dying to try this recipe and was wondering, would it ruin the recipe if I were to sprinkle Semolina on my parchment paper before baking the loaf?
Hi Annette, no semolina is fine to use. Let me know how it goes. Take care!
Hi Rosemary, I’ve been playing around with this recipe some for the last year and have tried several tweaks. The large boba to dough proportions are similar to a ciabatta recipe from Carole field that I love. The large proportion of biga gives such a nice earthy flavor to the loaf and reminds me of breads I had in Italy as a 6 year old, bring back 60 year old memories. I have been working with higher hydration doughs and have experimented with a wetter biga or less flour in the dough with a little less salt. Both have come out well as long as you refrigerate the dough prior to shaping to stiffen the gluten. I am also using a 11.7 % protein high ash flour (King Arthur Galahad) and filtered water. I double the recipe and do three oval loaves. I bake in a covered lodge Dutch oven and the remove the lid for the last 15 minutes.. this is a wonderful base recipe and is going to give people a truly italian loaf that is impossible to find outside of Italian villages now. The city breads don’t come close.
Hi Chet, thanks so much, so glad I could bring back memories and I love how you have worked with the dough. Take care!
I love the simplicity of the recipe, but have a couple of questions.
Firstly, I’ve tried this bread twice – the first time with a 24 hour period and the second with 18 hours for the biga and both have produced a noticeable sour note. Would that be eliminated with a shorter ferment period, do you think? I make a recipe for an Italian type roll that is used with Chicago-style hot Italian roast beef sandwiches and the like, which has an 11-12 hour period. (It’s more a sponge as it uses more water.)
Secondly, and this one is a bit odd…I do get it with the Gonnella-style rolls as well… Why is the interior of my bread coming out tan when using white flour?
Okay, granted it’s an unbleached flour, but when making white sandwich loaves, with no sponge time, or even making it using the Yudane method with an overnight ripening period, the bread interior is white. But every time I make this it is not. I also get a darker crust whether it’s baked in the conventional oven or the AGA.
I’m at a loss as to why – and not sure if you might have insight.
Thanks
Hi Marri, yes a shorter biga time will produce a less sour loaf. I just read this which might explain it “Yellowish crumb is a sign of well-crafted bread made with unbleached flour. Gentle mixing could be a way of preserving that coloration to minimize oxidation. Autolyse is also used, where you leave the dough alone after mixing and let it develop gluten on its own.” Hope that helps. Let me know. Take care.
Hi Rosemary,
I made the bread again and only gave the Biga about a 6-7 hour rest. It was much less sour and hit the right note. I am still getting a tan colour to the bread, but hey, I can live with that. I know the flour is the right one to use.
Here it is, day 3 with the loaf, and it’s still soft. Getting ready to make bruschetta for supper and thought I’d give an update.
Hi Marri, thanks so much, there are a couple of things you could do to get it to brown more, you could turn the temperature up a bit or brush the dough with a little milk before baking. Nothing like bruschetta. Take care.